My “Baby” had her 4th birthday party with some of her little friends over the weekend. When I asked what she would like her theme to be…she yelled “RAINBOW!” Ok girlie…rainbow it is 🙂 I’m not the most “creative” genius there is {remember, I am “comfy” NOT “creative”)…but I have a willing heart, so I scoured Pinterest for some inspiration.
I truly enjoyed making this special cake for her and thought to share with you. It was a “piece of cake” hehe! For those of you intimidated of making double layer cakes– please don’t be. Again…I am not a baker- just a normal gal. If I can do it, so can you!
There IS something special about a homemade birthday cake, isn’t there? This was one very special cake indeed. The kids LOVED the outside of the cake- then I told them there was a surprise on the inside too…you should have seen their faces. Adorable.
This is where I got my inspiration: The Idea Room and Omnomicon.
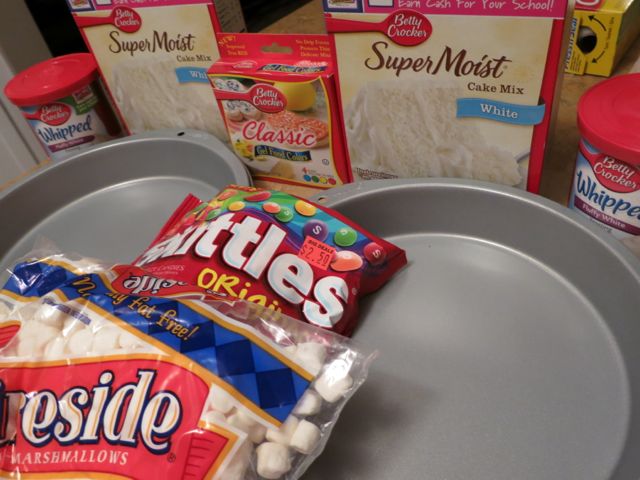
The ingredients: 2 WHITE cake mixes, 2 fluffy white tubs of frosting, 2 cake pans {with liners}, gel food coloring {this stuff is vibrant!}, skittles and marshmallows.
Make cakes separately in two bowls. This will insure them being even with one another. Follow package instructions.
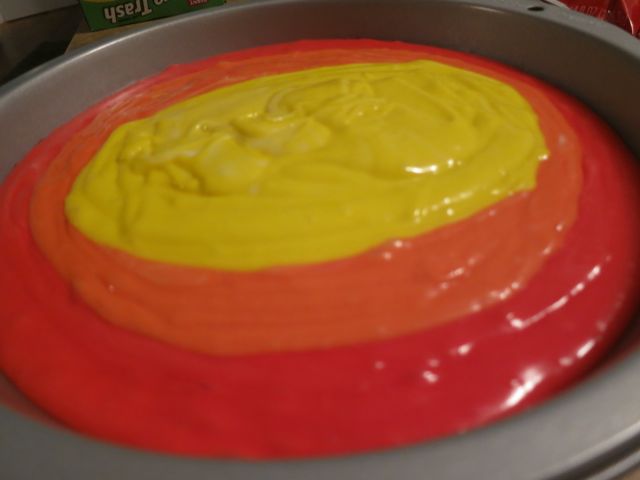
Gather up 3 bowls. For the first cake I went in rainbow order. There will be 3 cups of batter per cake. Put 1 cup of batter in each bowl- red, orange and yellow. You will have to mix the red and yellow to make orange. There is no special amount I used- I just squirted in there like so.
Stir well. Do this again with blue, green and purple {mixing the red and blue together}.
Line your cake pans with wax paper liner, spray with Pam {or butter}, then pour the red in, on top of that pour the orange then the yellow. It will flatten out like so.
Pretty neat!
Bake 30 mins in a 350 oven.
Cool on wire rack until completely cool- if your cakes are still warm, they may crack during this next step!
Frost in the middle then place the other cake on top and frost all over.
Use Skittles to make a rainbow and to decorate the sides. Use marshmallows for clouds. This was SO easy- and {I thought} it was super adorable.
I found some cute candles at the grocery store- yea! I didn’t have to draw anything on the cake, lol!
Happy Birthday Munchkin!!!!!
Surprise inside! Wohoo! Oh and yes….that is “superman” ice cream. I just could not resist.
One FUN cake!!! I would make this again in a heartbeat…just adorable!!!!
I had a lot of fun decorating the house for her party.
But again, you aren’t going to see anything fancy with me…. that isn’t my strength. I think us ladies can sometimes get overwhelmed with all of the talent out there on Pinterest {esp with party planning}. For those ladies who are super talented- that is awesome! But for those of us who have different talents, we shouldn’t be intimidated 🙂 If we have a heart for opening up our homes -that is the most important thing. No one comes to see your home anyways {unless its up for sale!}, they come to see the people.
Another thing I don’t get all excited about? Messes. I popped up a table in the garage and we had some good old fashioned kid fun. That garage was covered in glue and fruit loops by the end of the night ….Oh well?! The kids had fun! It can all be cleaned up. Let em be kids. 🙂
| Rainbow Birthday Cake |
- 2 white boxed cakes {with ingredients on package directions}
- Food coloring gel
- 2 jars fluffy white frosting
- 1 large bag skittles
- 2 handfuls of marshmallows
- 2 cake pans
- waxed paper liner and Pam spray
- Make cakes in 2 separate bowls according to package instructions.
- you will need 6 bowls with 1 cup of cake batter per bowl. Make your desired colors. I made cake #1 with red, orange and yellow. Cake #2 with blue, green and purple.
- Trace the outside of your cake pan onto waxed paper liner and cut to fit your cake pan. Place liner in cake pan and spray with Pam or butter. These cakes will not stick!!!
- Pour each color of batter on top of one another like picture above.
- Bake in a 350 oven for 30 mins or until center is baked through.
- Take pans out of the oven and set directly on a wire rack.
- When completely cool turn over first cake.
- Frost top. Then turn second cake on top of first cake.
- Frost the top and sides.
- Make a rainbow pattern using Skittles. Place Skittles along the edge and finish with marshmallow clouds.


where is the share button? I love this idea but can’t figure out how to pin it or save it. I definitely want to do this for my kids, they would love it.
as soon as I commented the sharing buttons popped up. Love it 🙂
This is a very cool idea! Quick question, what size pans do you use? I have 9 inch cake pans & I want to make sure I don’t overflow my pans if that’s too much for that size. 🙂 thanks! 🙂
I used a 9 “- great question!
You don’t have to worry about overflowing your pans – I have done this with 8″ pans- using just one cake mix!
I love your recipe and thank you for the pictures to go along with it. I just had my daughters rainbow birthday the weekend before this past one. And it was the exact same thing, I would have loved to use your recipe. I was going to attempt to make it but did not have time and ended up with a Costo cake and put a rainbow on it. But I love homemade cakes. Good job you did an awesome job, especially on deco. You are creative, and your art is food. A way to my heart….lol 🙂
Blessings,
Adrienne
The work you went to to make that spectacular cake is PROOF that you love that child!! 🙂 What a fun fun cake.
Yours was decorated better than the inspiration.
WOW Thank you Amy!!!
Wow you made a fantastic job with this cake! it looks incredible! We’re celebrating my son’s birthday in 1 week and a half and I’m trying to get inspiration 🙂
Aww, thank you so much!!! Happy Birthday to your son!
I love this! The party turned out awesome!
Thank you!
Gonna be perfectly honest… I am stealing and making it for my daughter!!! The rainbow cake I planned but the outside is just too cute!!!
Thanks so much for the link back! I love how you put a fun twist on the rainbow cake. Happy Birthday to your cute girl!!
Thank you Amy! And thanks for the inspiration!!!! Love your idea room!!!!
This is beautiful! I always waste money on store bought cakes because I am not a baker. But I really want to try this! Two of my girls have April birthdays and this would be great for their spring party!
Thank you Stacy! I am not a baker either…if I can do it, so can you! Perfect for a Spring party. You will get TONS of ohhhs and ahhs!!!
Wow! The cake is so beautiful I hope you won’t mind if I try making it.
K
Of course I don’t! lol! Id love you to!!!