Archives for November 2014

The Best {Kitchen} Black Friday Deals

Keurig

Hi Ladies! I have had several e-mails that have asked me what the best deals are online for Kitchen supplies. So, I decided to give you a post as far as what I was seeing {and liking} out there on the internet for today’s Black Friday sales!

Here we go…

Anolon 11 piece cookware set


I love the glass lids, non-stick and dishwasher safe aspects of these heavy-duty pots and pans! A great deal for $269.99 {was $450!}

The Kitchenaid 5 qt Mixer


WOW!!! For the price and quality, Kitchenaid is by far one of my favorite brands. Right now it’s on sale for $279.99 on top of that Kitchenaid is offering a $50 rebate! That’s just $229.99 for a standing mixer that is originally priced at $429.99 {50% off}!

Charbroil Gas Grill with Side Burners


This is the grill I have (yes, I use a gas grill-I know, I know- but it’s so much easier). The price of this was $300.32 and today it’s marked down to $175.99! This is the BEST time of the year to buy grills and they are great gifts for the man in your family who is hard to buy for.

Keurig K130


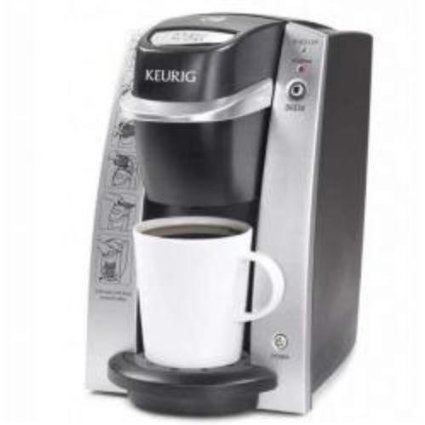
This is a deal I personally took advantage of for a family member for Christmas. This is an Amazon’s #1 Best Seller which was originally priced at $129.99 and I purchased it for $ 70.99. This is a great gift for a college student, a private office, or for that special someone who loves coffee, but no one else in the house does (crazy, I know). For almost half off- it’s a great deal for a trusted brand!

Ninja Professional Blender


After many blenders and frustration, I finally purchased the Ninja and couldn’t be happier. I’d recommend this blender to anyone. Today, I saw it on sale for $110.85, the original price was $149.99. If you or someone you know is in need of a blender- go no further.

Happy Shopping Everyone! Love to you, Janelle

Signature

Homemade Birthday Cakes

IMG_3262

My “middlest” is turning 9 next week and as cliche as it sounds it just doesn’t seem possible. She is such a sweet, giving and thoughtful little girl – I’m so grateful to be her mom. As I was looking through Pinterest for ideas about what to make for her cake, it dawned on me that my beloved mother-in-law was the one who inspired me to start baking my own cakes. My husband remembers her making his cakes for his birthday growing up and he said it brought back great memories. For something I never gave much thought to before, it certainly has been a sweet tradition I’ve had the joy of carrying out.

Now, I’m not a “Pinterest Perfect” baker- you aren’t going to see rolled fondant from this girl. But, what you will see is a mom, wife, daughter, daughter-in-law and friend who loves the people around her ….


IMG_1184
Our youngest wanted a rainbow themed party one year….she loved this cake.

IMG_1191
IMG_1245
Our oldest had a baseball party and he absolutely LOVES Oreos…so we mixed the two that year.

IMG_1249
IMG_1378
One of my dear friends got engaged!

IMG_1667
Our daughter was very into horses one year. My best effort, lol- she loved it despite the lack of perfection.

IMG_1753
Happy Birthday Jesus!

IMG_2280
My Father-in-Law loves carrot cake, so we made him this for his birthday one year.

IMG_2301
There’s my sweet mother-in-law catching a memory 🙂

IMG_2302

IMG_3060
IMG_3136
And here comes the Minecraft Creeper cake….it’s a beauty, isn’t it.

IMG_3138
IMG_4109
My little one’s balloon funfetti cake….

IMG_4421
This one the kiddos got to make themselves for grandpa…they were SO proud.

IMG_1050
And for another dear friend ….

Do you purchase or make your own cakes? What’s your favorite cake?!

This post is dedicated to my dear mother-in-law who is in the final stages of cancer. I can’t tell you how much she has influenced my life and has made me a better mother. Love her so much…

Signature

The Best Thanksgiving Turkey Recipe Ever

IMG_7090
I’ve been getting a lot of e-mails asking me after I thaw and brine my turkey…how do I roast it the next day?  This recipe comes from The Food Network’s Giada DeLaurentiis and it has become my absolute favorite way to roast a turkey. The first time I had this was at my dad’s house a few years ago and I’ve made it every year since. It’s incredibly flavorful, makes the turkey moist and even the people who say they don’t like turkey…..love it. Not kidding. 

IMG_7060
Stuff, season, and butter as directed. 

IMG_7075
Cover and roast for 20 mins, then add broth. 

IMG_7079
Baste as directed. 

IMG_7081
Roast until the internal temperature is at 165 degrees. Cover with foil after it is done roasting and let it sit for 30 mins before carving. 

IMG_7082

IMG_7090

IMG_7091

The Best Thanksgiving Turkey Recipe Ever
Author: Giada DeLarentiis
Prep time:
Cook time:
Total time:
Serves: 8
http://www.foodnetwork.com/recipes/giada-de-laurentiis/turkey-with-herbes-de-provence-and-citrus-recipe.html
Ingredients
  • 1 (14 to 15-pound) turkey, neck and giblets reserved
  • 1 orange, cut into wedges
  • 1 lemon, cut into wedges
  • 1 onion, cut into wedges
  • 6 fresh rosemary sprigs
  • 6 fresh sage sprigs
  • 6 fresh oregano sprigs
  • 7 tablespoons unsalted butter
  • 2 tablespoons herbes de Provence
  • 1 tablespoon olive oil
  • 1 1/2 teaspoons salt
  • 1 1/2 teaspoons freshly ground black pepper
  • 6 cups canned low-salt chicken broth (approximate amount)
  • 1/3 cup all-purpose flour
  • Read more at: http://www.foodnetwork.com/recipes/giada-de-laurentiis/turkey-with-herbes-de-provence-and-citrus-recipe.html?oc=linkback
Instructions
  1. To make the turkey: Position the rack in the lowest third of the oven and preheat to 400 degrees F.
  2. Rinse the turkey and pat it dry with paper towels.
  3. Place the turkey on a rack set inside a large roasting pan.
  4. Place the orange and lemon wedges, onion, and 2 sprigs of each fresh herb in the main turkey cavity.
  5. Tie the legs together to hold the shape of the turkey.
  6. Stir 2 tablespoons of butter, the herbes de Provence, oil, and 1 1/2 teaspoons of each the salt and pepper in a small saucepan over medium heat just until the butter melts.
  7. Rub the butter mixture all over the turkey and between the turkey breast meat and skin.
  8. Place the turkey neck and giblets in roasting pan.
  9. (Recipe can be prepared up to this point 1 day ahead.
  10. Cover and refrigerate. Let stand at room temperature 30 minutes before roasting.)
  11. Cover the turkey breast with foil.
  12. Roast for 20 minutes.
  13. Pour 3 cups of broth into the pan and stir to scrape up any brown bits on the bottom of the pan.
  14. Add the remaining sprigs of fresh herbs to the pan.
  15. Roast the turkey for 40 minutes.
  16. Reduce the oven temperature to 350 degrees F.
  17. Remove the foil from the turkey; pour 1 more cup of broth into the pan.
  18. Continue roasting the turkey until a meat thermometer inserted into the thickest part of the thigh registers 165 degrees F to 175 degrees F or until the juices run clear when the thickest part of the thigh is pierced with a skewer, basting occasionally with pan juices, about 1 hour and 30 minutes longer.
  19. Transfer the turkey to a platter and tent with foil. Let stand 30 minutes while preparing the gravy.
  20. To make the gravy: Strain the turkey pan juices from the roasting pan through a sieve and into a 4-cup glass measuring cup; discard the solids. Spoon off the fat from atop the pan juices. Add enough chicken broth, about 1 to 2 cups, to the pan juices to measure 4 cups total. Melt the remaining butter in a heavy large saucepan over medium-high heat. Add the flour and whisk for 1 minute. Gradually whisk in the broth. Simmer until the gravy thickens slightly, whisking often, about 10 minutes. Season with salt and pepper. Serve the turkey with the gravy.
  21. Read more at: http://www.foodnetwork.com/recipes/giada-de-laurentiis/turkey-with-herbes-de-provence-and-citrus-recipe.html?oc=linkback


Signature

How to Make a Christmas Centerpiece With What You Have

photo
Christmas decorations can so comforting, but they can also break the bank if you let them. I’m sure it might come to no surprise that I love a “comfy” centerpiece, but this year I truly did not want to go buy a lot.

Here’s what I used to make mine…

A rustic fruit bowl I already had (from Goodwill)
3 mason jars I purchased from Michaels this week (they are on sale for .99 cents each)
Pine cones I already had from last year.
Candles I had on hand.
Holly berries and tree foliage from my yard.

I love this because its natural and comforting….

What are some ways you save with Christmas decor?

P.S. Forgive me for talking about Christmas before Thanksgiving, I’m getting head start this year!

Signature

How to Brine Your Thanksgiving Turkey

Brine 3
Brining is the *key* to making a delicious, moist and flavorful Thanksgiving turkey. It’s a sweet and savory marinade that adds that extra “something” to your main course. It’s simple, yet worth the extra few steps!

Brine1

In a large stock pot boil all ingredients (but ice). 

Brine2
After simmering for 1 hour, put ice in and let cool. 

Brine 3
Place a thawed turkey with insides removed in a large cooking bag. Place on a foil turkey roaster. Pour cooled brine over top. 

Brine 4
Place in refrigerator overnight before roasting.

* It may take up to 5 days to thaw your turkey, just a huge FYI!


How to Brine a Turkey
Author: Janelle Nehrenz
Prep time:
Cook time:
Total time:
Serves: 10
Ingredients
  • 1 gallon vegetable stock
  • 1/2 cup kosher salt
  • 3/4 cup brown sugar
  • 1 Tbsp black peppercorns
  • 2 tsp cinnamon
  • 2 sprigs Rosemary
  • 4 Sage leaves
  • 6 cups ice
Instructions
  1. In a large stock pot boil all ingredients (but ice).
  2. After simmering for 1 hour, put ice in and let cool.
  3. Place a thawed turkey with insides removed in a large cooking bag.
  4. Place on a foil turkey roaster.
  5. Pour cooled brine over top.
  6. Place in refrigerator overnight before roasting.
Signature

Colored Popcorn {Pink}

IMG_4086

Colored popcorn is a yummy little treat that is not only easy to make- but enjoyed by ALL {grown-ups, kiddos, GF and glutenous maxiumus friends} You can decide on the color- here I used pink. But, I can see blue for a “Frozen” birthday party, red and green for Christmas, green for St. Patty’s day, etc. 

IMG_4078

Pop 4 bags of microwave popcorn separately {2 mins each bag} and place into two bowls. 

IMG_4080
In a medium saucepan combine sugar, corn syrup, and half and half. Let simmer until a rapid boil forms. 

IMG_4081
Take off of burner and add vanilla and your choice of food coloring. 

IMG_4082
Mix well. Spread out on parchment paper. You can tell I used buttered popcorn {which tastes great} however, for a more dramatic effect, I would use plain popcorn next time so the color comes through a bit better. 

IMG_4085
Let cool. 

IMG_4086
Ready to eat! Have fun! 

Colored Popcorn {Pink}
Author: Janelle Nehrenz
Prep time:
Cook time:
Total time:
Serves: 12
Ingredients
  • 4 bags popped microwaved popcorn {popped individually- 2 mins each}
  • 2 cups sugar
  • 2/3 cup half & half
  • 1 Tbsp corn syrup
  • 1 tsp vanilla
  • food coloring of your choice
Instructions
  1. Pop popcorn and place into two bowls.
  2. In a medium saucepan add sugar, corn syrup and half & half. Let simmer until it boils on medium-high heat.
  3. Take off of heat and add vanilla and food coloring.
  4. Add syrup to popcorn and mix well.
  5. Pour popcorn out onto a table lined with parchment paper {or waxed paper}.
  6. Let cool.
Signature