Archives for December 2010

Pot Roast with Garlic


This is a recipe my mom always made for me as a child…now, I make it for my family! It is the perfect supper to have on cold winter days. If you like garlic as much as I do, you will love the way it is  added into the meat to carry out its delicious flavor. Serve with dinner rolls for dipping and a nice garden salad..it will be wonderful. 
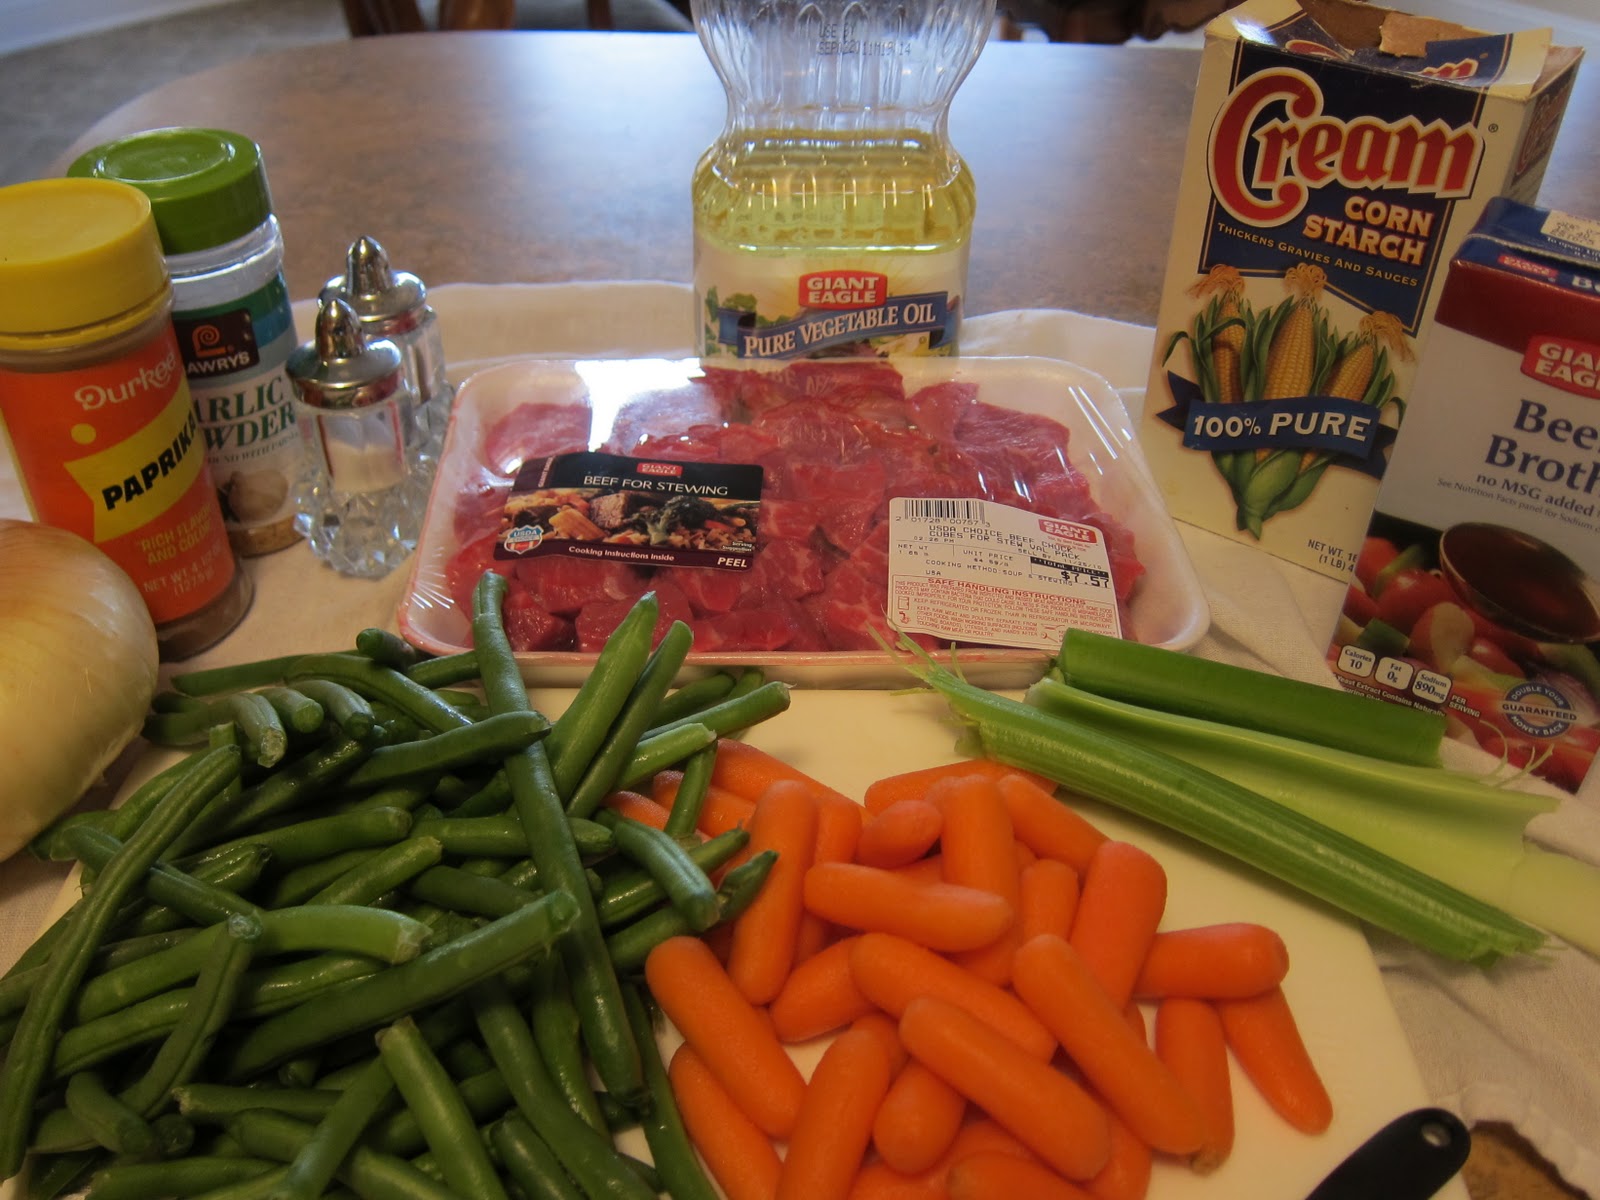
Start out with a roasting meat of your choice.. you can use chuck, top/ bottom round, or rump.  I suggest purchasing 1 lb per 2 servings. I have a 3 lb roast in this photo
(keep an eye out at your grocery store these meats are often BOGO). 1 large can of beef broth, olive oil, garlic and salt and pepper. 
I use 1 head of garlic in my roast, but have 2 here to show you what it looks like when I prepare it. I peel the outside layers off like so…
And break the cloves apart and peel the outside layer of the cloves off…
Then cut into quarters
With a sharp knife cut slices into the meat (about an inch through)
Fill the holes in the meat with the quarters of garlic on all sides. 
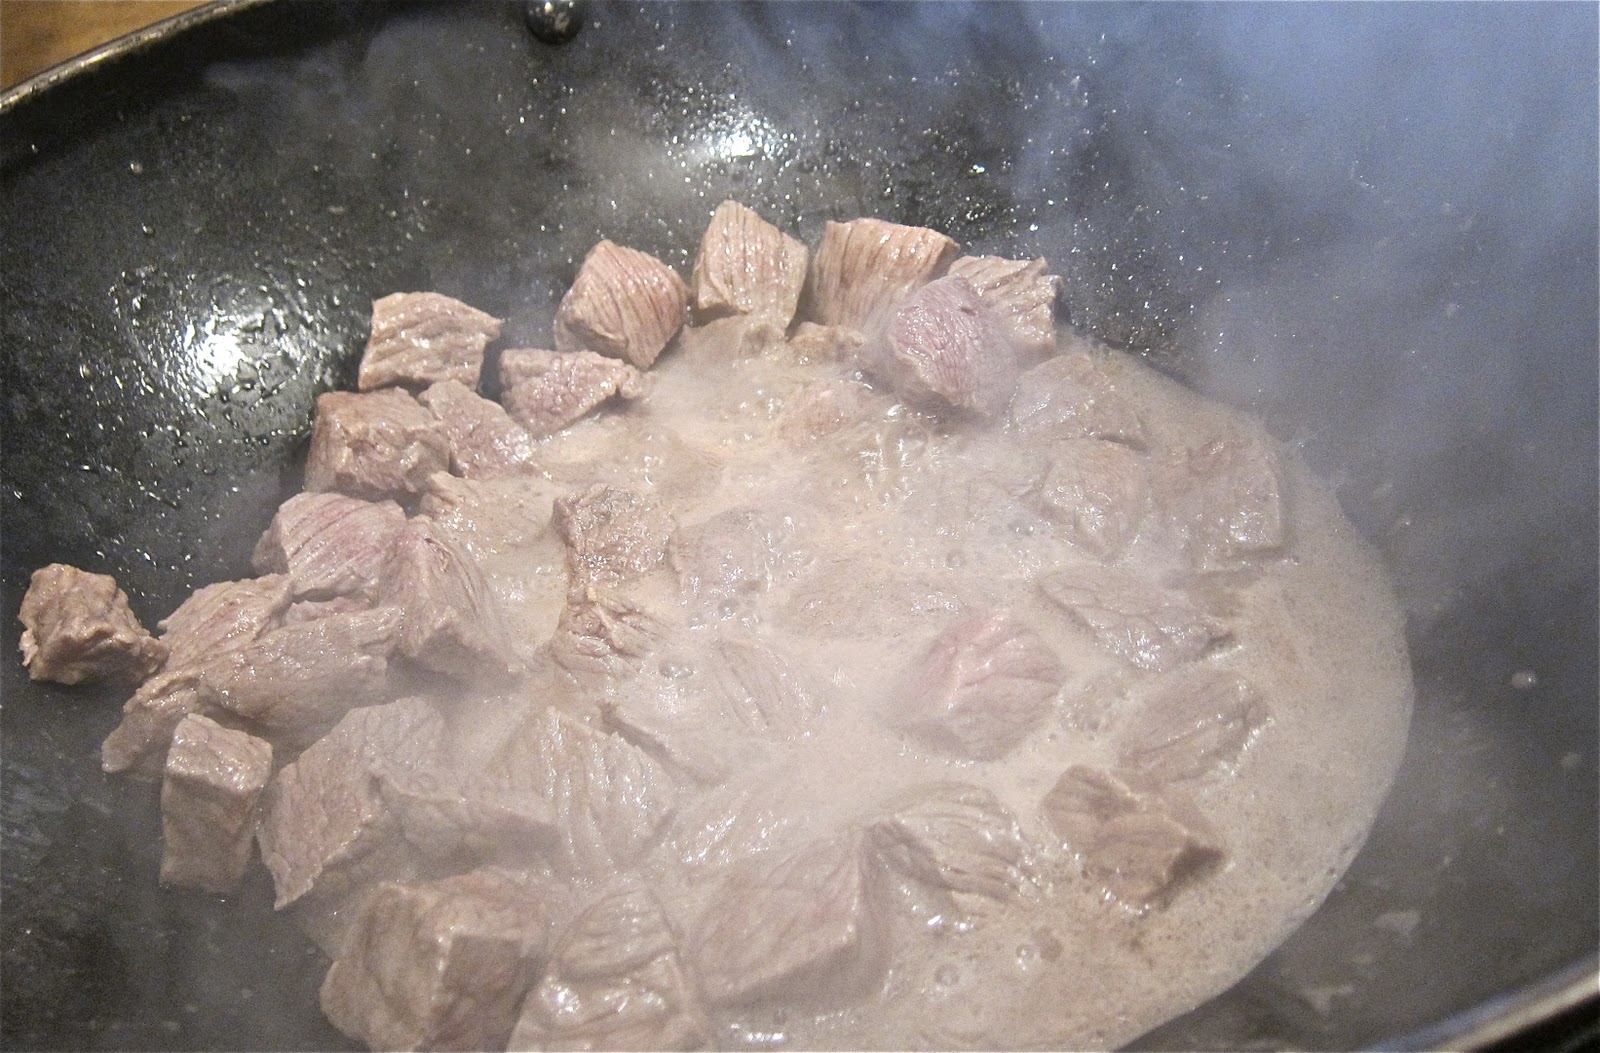
Place olive oil in a large pan and heat to medium/high heat. Brown all sides of the roast and season with salt and pepper. This will only cook the meat 1/4 of an inch through, but it adds a delicious flavor! 
Place your roast into a Crock Pot (you can also do this on a stove in a large pot).  Season with worcestershire sauce. 
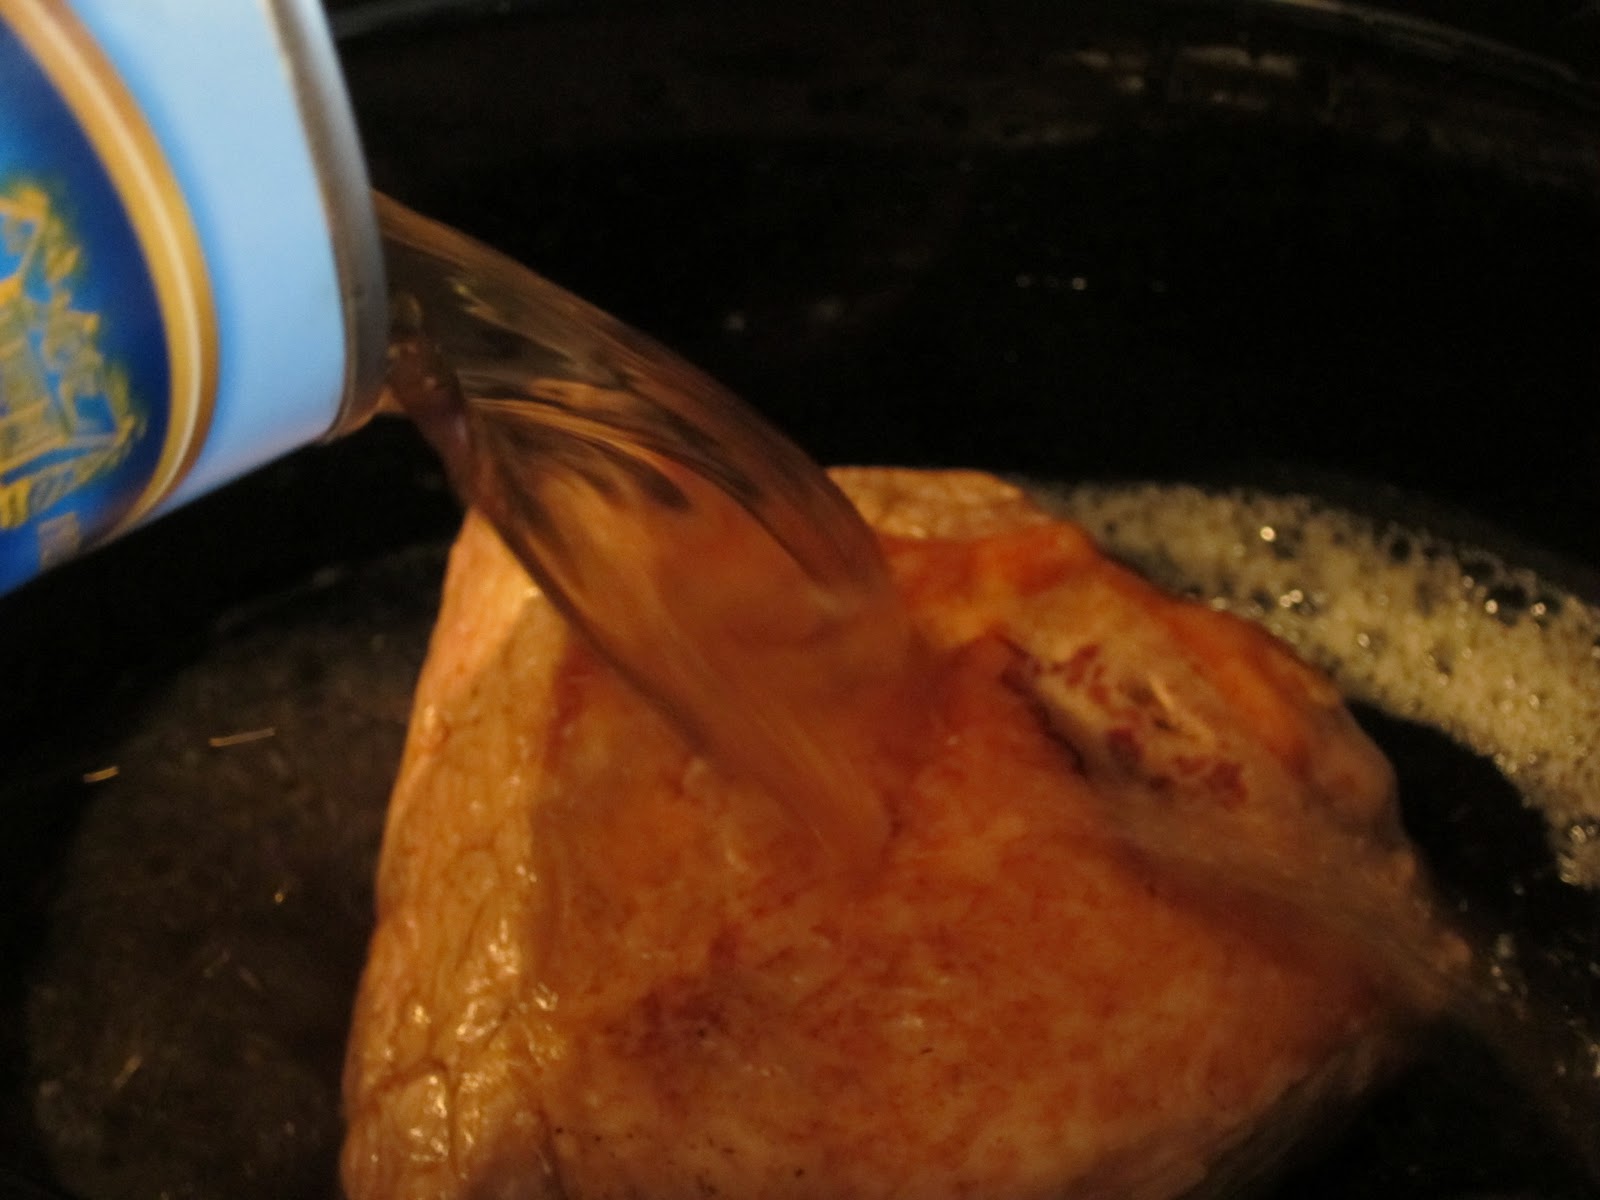
Pour 1 large can of beef broth over top 
Prepare your veggies..I have here potatoes cut in halves, onions cut in quarters and baby carrots. (I also really like cabbage, but my hubby doesn’t, so I spare him ..haha)
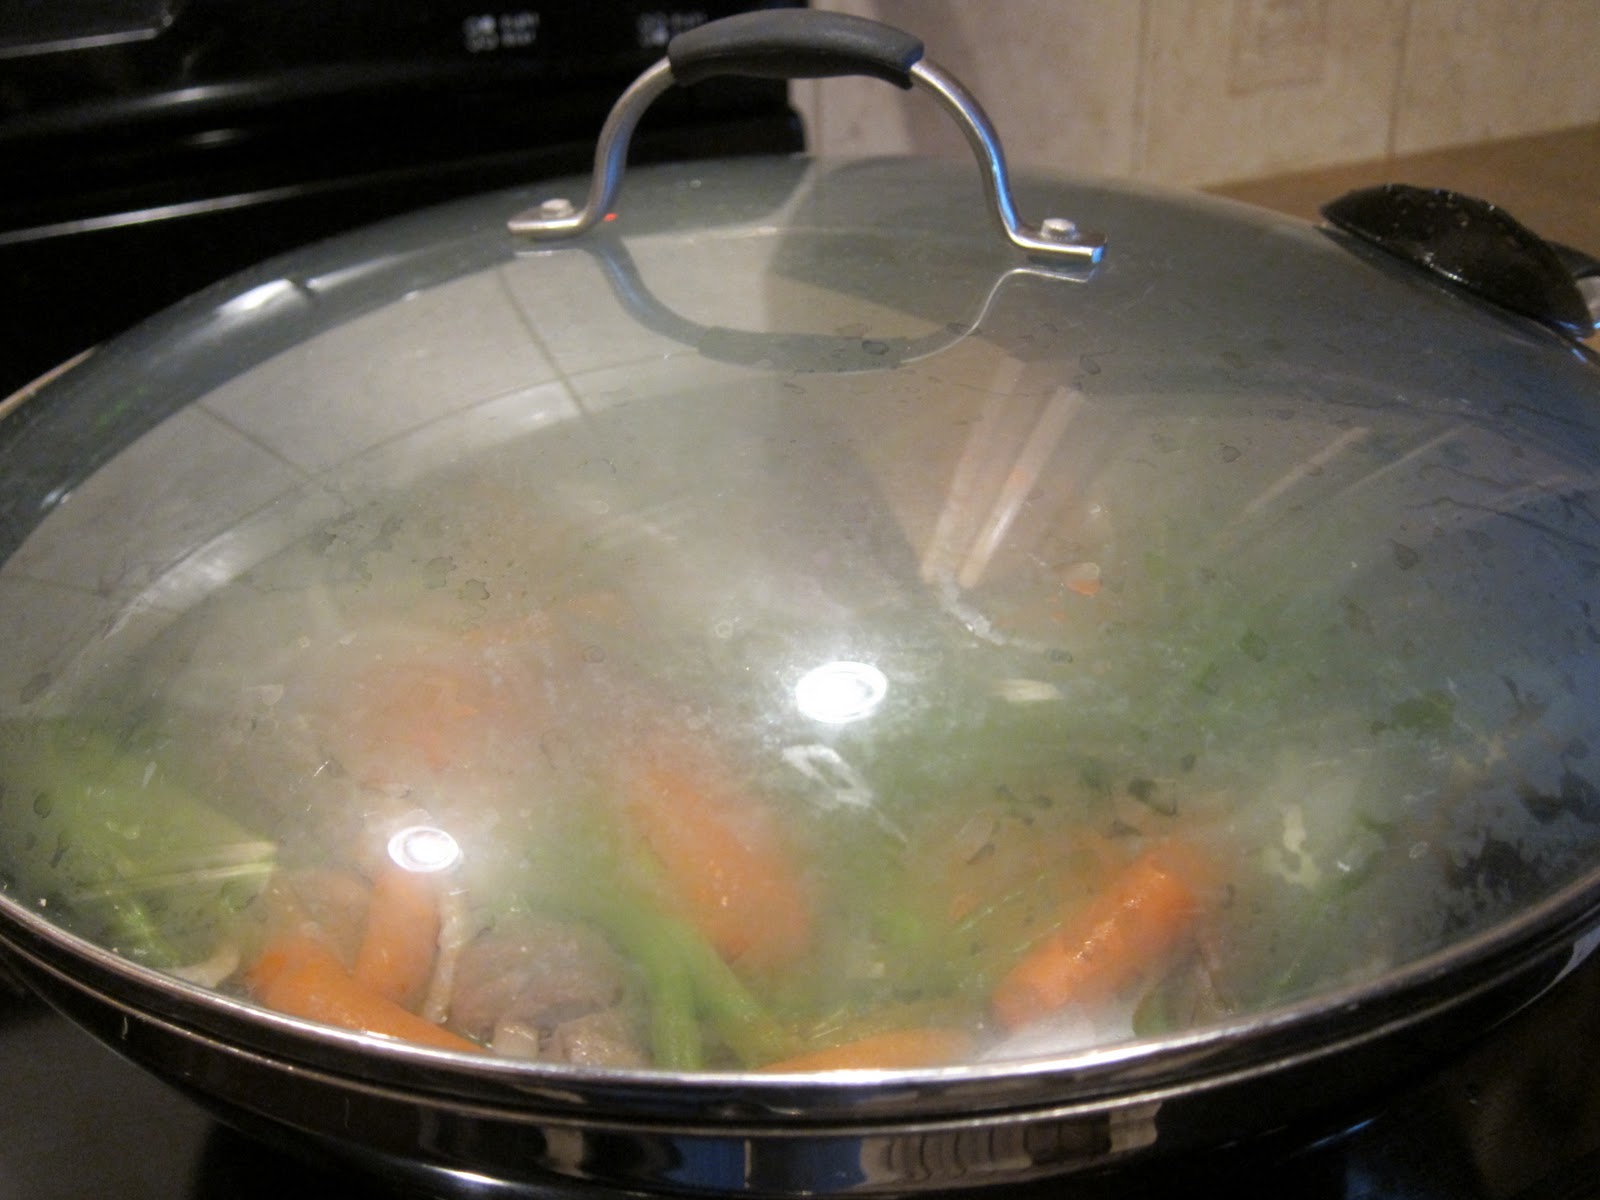
Simply place all your veggies on top of the meat, if the broth does not cover everything you may add water. 
Cover and cook on high for 6 hours in the Crock Pot. If you are cooking stovetop, place on a medium heat. 
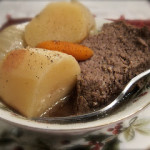
When your roast is done the veggies will be tender and the roast will flake apart..Mmmm

Pot Roast with Garlic
3 lb roast (or larger)
1 large can of beef broth
1 head of garlic
2 Tbsp olive oil
1 onion cut into quarters
2 cups baby carrots
4 potatoes cut in half
1 tsp worcestershire
salt/pepper
water (optional to cover)
Slice small holes in roast and fill with garlic quarters. In a large pan, heat olive oil on med/high heat and brown meat on all sides seasoning with salt and pepper. Place meat in Crock Pot and season with worcestershire sauce, pour beef broth over top. Cut onion into quarters, potatoes into halves, and place all veggies into Crock Pot over top of meat. Add water to cover if needed. Cook on high for 6 hours in crock pot or if using stove top cook on medium.
ENJOY!
~Janelle

TastyTuesday200pix The Worst Cook in America   Cooking with Kids


Signature

Ham Salad


If you enjoyed a Christmas Ham over the weekend you may be glancing in your refrigerator wondering to yourself “What am I to do with all these leftovers?!” This is a recipe I make when I have leftover ham…it is so simple, is great made into sandwiches, and as a spread for crackers. 
 leftover ham (with pineapple), sweet pickle relish, mayo
In your food processor, add your ham and 2 pineapple rings (optional)
Process to desired consistency
Add relish and mayo and run the blades a few times to mix evenly.
Spread on sliced bread topped with cheese for a delicious sandwich (I make these ahead of time and place them in Ziploc baggies in the refrigerator)
Or spread on crackers for a yummy mid-afternoon snack or appetizer!


Ham Salad


4 cups left-over ham (cut in pieces)
1/4 cup sweet pickle relish
1/3 cup mayo
2 pineapple rings (optional to taste)


Place ham and pineapple in a food processor and process until desired consistency. Add relish and mayo and pulse until combined. Serve on bread or crackers. 
Enjoy!
~Janelle 


*Try this AMAZING Easy Ham and Cheese Quiche for another recipe using your leftover ham! (featured at www.womenlivingwell.org)
Signature

Merry Christmas

Merry Christmas!!!!
What a blessing it is to have you as my Sister’s in Christ! 
Keep cooking for the King (I am sure many of you are doing that today!) 
Love, Janelle 


What a neat house! 
Signature

Strawberry Spinach Salad with Homemade Poppyseed Dressing


This is one of  my all-time favorite salads! it tastes delicious, is absolutely beautiful, and can be doubled. I have actually quadrupled the recipe for church functions and have had many people ask to take “doggy bags” home because they enjoyed it so much 🙂 

 If you have been asked to “bring a side” to your Christmas gathering… this would be an amazing salad to bring because of the gorgeous red and green coloring. I hope you enjoy this one as much as I do…I make it often!  

Let me calm you..it is not scary to make your own dressing!!! I promise! Worcestershire sauce, olive oil, vinegar, sugar, onion, poppy seeds, sesame seeds (you may not have these- they are with the spices in the grocery store)
Whisk together- that is IT! Now you can breath..AHhhhhh… 
I use pre-packaged baby spinach and just toss it in a nice bowl (I do not remove my stems), then add sliced strawberries and slivered almonds.
Toss with dressing and refrigerate until ready to serve! Isn’t this beautiful? Oh, I just love it.

Merry Christmas everyone…we are so blessed to have one another as Sisters in Christ…the internet is an amazing thing isn’t it? We can “meet” one another from across the globe and share our love for Christ with each other! Even in areas that are not predominately Christian, a person can “log on” and feel connected in fellowship. God is good.
Love to you all, Janelle

Strawberry Spinach Salad with Homemade Poppyseed Dressing
 
Author: Janelle Nehrenz
Prep time:
Total time:
Serves: 8
Ingredients
  • Strawberry Spinach Salad
  • 1 10oz bag of baby spinach (or appx 6 cups of leaves)
  • 2 cups sliced strawberries (I use an entire plastic container)
  • 1/2 cup slivered almonds
  • Dressing
  • 1/2 cup olive oil
  • 1/4 cup white vinegar
  • 1/4 tsp worcestershire
  • 1/4 cup sugar
  • 2 Tbsp sesame seeds
  • 1 Tbsp poppy seeds
  • 1/4 cup minced white onion
Instructions
  1. Whisk all the dressing ingredients together.
  2. Place clean spinach in a bowl and top with sliced strawberries and almonds.
  3. Toss with dressing.


TastyTuesday200pix The Worst Cook in America   Cooking with Kids


Signature

EASY Thumbprint Cookies

This is a recipe I have been using every Christmas for quite a few years…I got it off of allrecipes.com (love that site!) Chances are you have all the ingredients..so, if you have not made your Christmas cookies, you are in LUCK! No worries about rushing to the grocery store with this recipe!

 These cookies are light, buttery and delicious…they are even great to freeze. Enjoy! I know I have! 
~Janelle 
Sugar, Flour, Butter, Jam

Beat Sugar and Softened Butter  (microwave butter for 15 seconds)

Mix in Flour- it will be a crumbly mixture. 

Shape into small balls (about 1 tsp) and make a thumbprint in the center

Place a small amount of jam in the center of each cookie and bake in a 375 oven for appx 15 mins. 

Allow to cool on a cooling rack 
MMMM!!!! Enjoy

Thumbprint Cookies

1 cup butter (softened)
1/2 cup sugar
2 cups flour
Jam

Preheat oven to 375

Cream together butter and sugar. Add flour and mix with mixer..dough will be crumbly. By the teaspoonful shape into round balls and place on an un-greased cookie sheet. Make thumbprints in each dough ball and fill with your favorite jam. Bake for 15 mins.

Signature

Christmas Cut-Out Cookies

This recipe was shared by Lisa Morgan at www.blessedwithgrace.net  and posted on www.titus2atthewell.com. My children were begging if we could make cut outs this year.. I read this recipe and knew it would be delicious- I love, love, love sour cream in pastries, and the mixture of crisco with butter give these cookies a rich and dense texture. I let my children do the cutting and the decorating…they did such a great job! Love this recipe! 5 more days till Christmas…..

sugar, flour, butter, eggs, crisco, sour cream, baking soda, salt 

Beat the eggs, butter, sugar and crisco together 

Add and beat in sour cream

Add the remaining ingredients 

Mix well – batter will be stiff and sticky

Roll in a ball and cover with plastic wrap- refrigerate for at least 2 hours or over night.  

Make sure to have a well floured surface 

Roll out to about 1/2 inch thickness and use cookie cutters to cut your desired shapes. Bake @ 375 for 10-12 mins.

Make the frosting by mixing butter with 1 cup of powdered sugar and a tsp of vanilla 

Mix well until creamy

Add milk and remaining powdered sugar 

Decorate creatively! Good job Kidos!!!!


Christmas Cut-Out Cookies
1/2 cup Crisco
1/2 cup butter (real butter), softened to room temperature
2 cups sugar
2 eggs
1 cup sour cream
5 cups all-purpose flour (sift your flour)
1 tsp salt
1 tsp baking soda
1 tsp vanilla
Beat eggs, Crisco, butter, and sugar. Add sour cream and beat well. Add the remainder of the ingredients. Once the dough is mixed together, roll into a large ball, wrap in plastic wrap, and refrigerate. (You can refrigerate overnight.)
When ready to make the cookies, roll the dough out on a well floured surface, and keep your rolling pin floured. Cut out your cookies and place on prepared cookie sheets. Bake at 375 for 10 minutes.
Butter Frosting
1/3 cup soft butter (real butter)
1/4 cup of milk
3 cups confectioner’s sugar, sifted
1 tsp vanilla
food coloring (if desired)
Mix butter, vanilla, and 1 cups powdered sugar until light and fluffy. Add the remaining sugar and milk, alternating, beating until very smooth and of spreading consistency. Keep beating a little while after you think it is done, just to be safe. Then, divide into bowls and add food coloring as desired. Frosting will harden as it dries on the cookies. Once they are dry, they are easily frozen if you are not going to eat them in the next week or so.

Thanks for this great recipe Lisa! Merry Christmas…
Enjoy, 
~Janelle 


Signature

The Christmas Story (Sophia)

 I had to take this opportunity to share this sweet video of my dear friend Becky’s daughter, Sophia. This little doll is my daughter’s best friend (and an amazing performer!) This video is a reminder to me what Christmas is all about.…we have been given the ultimate gift…
Jesus Christ! 
It also reminds me to have a child-like faith as said in Mark 10:13-16…

People were bringing little children to Jesus for him to place his hands on them, but the disciples rebuked them. When Jesus saw this, he was indignant. He said to them, “Let the little children come to me, and do not hinder them, for the kingdom of God belongs to such as these.  Truly I tell you, anyone who will not receive the kingdom of God like a little child will never enter it.”  And he took the children in his arms, placed his hands on them and blessed them. 


Praying that you are enjoying the little people in your life as this week leads us to our 
Savior’s Birthday! 
Love and Blessings,
~Janelle


Signature

Peanut Butter Kiss Cookies-"Cupa, Cupa Cookies"


**Naturally Gluten Free… meaning -those with or without allergies will enjoy these! 


This recipe is always a “must” on my cookie tray list! These cookies are so simple that I call them “cupa cookies” because you need a “cupa sugar and a cupa peanut butter” (and an egg and the kisses of course). If you are doing Christmas baking this week, be sure to add chocolate kisses to your grocery list…chances are you have the rest of the ingredients!  
Enjoy! ~Janelle 

Sugar, peanut butter, an egg, chocolate kisses


Combine the sugar, peanut butter and egg


Beat until well combined


Roll by the teaspoonfuls onto a un-greased baking sheet (I foil line when I am baking to avoid having to scrub cookie sheets in between batches!). Make sure to give enough room for slight spreading. Bake in a 350 oven for 10 mins or until lightly browned. 


While cookies are baking, unwrap your kisses. 


When cookies are finished baking and while they are still warm out of the oven, lightly press a kiss on top of each one. 


VOILA!

Peanut Butter Kiss Cookies-"Cupa, Cupa Cookies"

Prep time:
Cook time:
Total time:
Serves: 12
Ingredients
  • Peanut Butter Kiss Cookies
  • (makes 2 dozen, may be doubled)
  • 1 cup peanut butter
  • 1 cup sugar
  • 1 egg
  • 1 bag of Hershey’s kisses (unwrapped)
Instructions
  1. Preheat oven to 350.
  2. Beat peanut butter, sugar, and egg with mixer. Roll dough into balls by the teaspoonful and bake for approximately 10 mins or until lightly browned.
  3. Take out of oven and gently press kisses on top of each cookie.
  4. Set on cooling rack.
Notes

THESE ARE NATURALLY GLUTEN FREE!


Signature

"Better than a hug" cake (lol)

Oh my sweet, sweet, friends…..THIS is THE cake to make! It is extremely moist, the crushed toffee gives it a sweet/savory taste, and there is an amazing mix of textures…YUMMY!  I made this last night for my church ABF get-together and it was a hit.

A dark chocolate cake out of the oven (I used a Duncan Hines box mix), 1 can of sweetened condensed milk, 6 Heath bars, 1 large container of whipped topping,  chocolate syrup,  caramel syrup. 
When the cake is still warm, poke holes throughout…I just used a fork
Pour the can of sweetened condensed milk over top the cake (I used a butter knife to evened it out over top-it will eventually saturate into the cake)
Crush Heath bars in a large Ziploc
Squeeze chocolate and caramel over top of cake and top with 3/4 of the crushed Heath bars. 
Then, top carefully with your Cool-whip
Drizzle caramel and chocolate over top of that and sprinkle with remaining Heath bars. 
"Better than a hug" cake (lol)
Author: Janelle Nehrenz
Prep time:
Cook time:
Total time:
Serves: 12
Ingredients
  • 1 dark chocolate cake made to directions in a 13×9 pan
  • 1 can of sweetened condensed milk
  • 1 cup (appx) of caramel syrup
  • 1 cup (appx) of chocolate syrup
  • 6 Heath bars (toffee bars) crushed
  • 1 large tub of Cool-whip
Instructions
  1. Make chocolate cake according to box directions.
  2. Let stand for about 5 mins then poke small holes throughout with a fork.
  3. Pour sweetened condensed milk over top and even out with a butter knife.
  4. Drizzle 3/4 cup each of chocolate and caramel syrup over top and add 3/4 of the crushed toffee.
  5. Spread Cool-whip over top and drizzle again with remaining chocolate and caramel syrups and sprinkle with remaining crushed Heath.
 

Might be one of the best things I have ever tasted…(oh, and I will tell on myself..this is the piece I had for breakfast..lol! it was small?)

I KNOW you are going to enjoy this one! 
Blessings to you!
~Janelle 


“We who had sweet fellowship together, walked together in the house of God in the throng” 
Psalm 55:14


I am participating in Tempt my Tummy Tuesdays @ http://www.blessedwithgrace.net and Tasty Tuesdays @ http://beautyandbedlam.com/ for more delicious recipes please visit these lovely Ladies! 


Signature

Peppermint Bark


Please come visit me over at www.womenlivingwell.org to get this delicious holiday recipe- 3 easy ingredients it all it takes! I also have a short video on how we make these beautiful cookie trays for all the wonderful staff at the school my children attend! 

I Hope you are enjoying all of the festivities leading up to the day our Savior was born! 

~Janelle
Signature

Holiday Ham

Ahhhh….a Holiday Ham (what a special treat for Christmas/Easter!) ! I just love making a ham because it is super easy, looks beautiful, and the leftovers can be made into so many things (ham salad, omelets, ham sandwiches, etc). If you have been asked to host Christmas this year and are intimidated by making a ham, please let me ease your mind..it really is one of the simplest meats you can prepare! There is a small trick I use to make the of ham less salty and more sweet..I hope you will enjoy this recipe as much as my family does! 
~Janelle 
I purchased a half ham (this would serve about 10-12) 
Start off by slicing the ham 1/4″ through diagonally one way and diagonally the other way to create a diamond pattern.
In a small bowl mix 1 cup of brown sugar with 2 tsp of cinnamon-set aside.
Place ham in a roasting pan and pour 1 liter of lemon-lime soda over top (this is a trick I learned that mellows the  naturally salty flavor of the ham)
Then, pat the brown sugar and cinnamon mixture all over the ham trying to get into the slices as much as you can (this will not be perfect)
Bake in the oven uncovered for 40 mins and take out. (as you can see the slices opened a bit)
Drain the juice of 1 can of pineapple rings into a small bowl and mix in 1 cup of brown sugar
Pour over ham
Sick a cherry in the center of a diamond and hold in place with a tooth pick, then add a ring of pineapple around it..cover the top and the sides of the ham in this way
Bake covered for 1 1/2 hours. Every 20 mins or so ladle the juice mixture over top.
Ready to be carved. Take off the pineapple and cherries and set aside on your serving dish (they are a great accompaniment). 
Dinner time! 
Christmas Ham
1/2 boneless ham
1 liter of lemon-lime soda
2 cups brown sugar
2 tsp cinnamon
1 can pineapple rings and juice
1 jar of cherries
toothpicks
Preheat oven to 400. Slice diamonds into ham and place in a roasting pan. Pour 1 liter of lemon-lime soda over top of ham. Mix 1 cup of brown sugar with 2 tsp of cinnamon and cover ham with this mixture. Bake uncovered for 40 mins and take out of oven. Open can of pineapple and pour juices out and stir with 1 cup of brown sugar, pour this mixture over ham. Stick a cherry into center of diamond fasten with a toothpick, place pineapple rings around cherry and toothpick, cover ham this way. Bake covered for 1 1/2 hours more remembering to ladle with juice from the bottom of roaster. Let sit for 15 mins before carving. Carve and serve along side of roasted pineapple and cherries
Enjoy!
~Janelle
I am participating in Tempt my Tummy Tuesdays @ At the Well, and Tasty Tuesdays @ Balancing Beauty and Bedlam. To see more recipe ideas, please visit these lovely ladies sites! 
Signature

Cheesy Potatoes


This is my “go to” recipe for Cheesy Potatoes…it is easy, quick, and delicious! I bring this to family functions and make it for company all the time (leftovers are great too!)…Serve with dinner or along side brunch..it is a wonderful recipe to have on hand for the Holidays. Enjoy! ~Janelle 
2 bags of  “Simply Potatoes” (shredded or cubed), cream of chicken soup, sour cream, butter, onion, shredded cheddar cheese, bread crumbs, salt and pepper  
In a large bowl mix together potatoes, cheese, cream of chicken soup, chopped onion, sour cream, 1/2 stick of melted butter, salt and pepper.
In a greased 9×13 pan, spread out the potato mixture.
Melt 1 stick of butter in a small dish and add 2 cups of bread crumbs and mix well
Spread bread crumb mixture over top of potatoes. Bake in a 350 oven covered for 45 mins then uncover and bake an additional 15 or until bubbling with a lightly brown crust. 
YUUUUMMMMMmmmmm!!!!!


Cheesy Potatoes
 
Author: Janelle Nehrenz
Prep time:
Cook time:
Total time:
Serves: 12
Ingredients
  • 2 bags of “Simply Potatoes” (these are sold by the eggs in your grocers refrigerator)
  • 1 can cream of chicken soup
  • 1 16 oz sour cream
  • 1/2 stick of butter melted
  • 1 onion chopped
  • 2 cups shredded cheddar cheese
  • salt and pepper to taste
  • Bread Crumb Topping:
  • 1 stick of butter melted
  • 2 cups of plain bread crumbs (you can also use crushed cornflakes instead)
Instructions
  1. Pre-heat oven to 350
  2. Mix together the first 7 ingredients and place in a 9×13 pan.
  3. Mix butter and bread crumbs, sprinkle on top of potatoes.
  4. Cover and bake for 45 mins, uncover and bake an additional 15 mins until bubble and lightly browned.


I am participating in Tempt my Tummy Tuesdays @ At the Well, and Tasty Tuesdays @ Balancing Beauty and Bedlam. To see more recipe ideas, please visit these lovely ladies sites! 
Signature

Cherry and Pecan Salad


When I am entertaining for the holidays, I typically put the most effort into the main course…the salad and the dessert really need to be quick and easy so I can put the entire meal together in time. This is a salad I made over the weekend that I thought I would share…very simple, not a lot of cutting, and so yummy!  My guest even asked to take some home with her! The red and green colors make it look festive with very little effort.. 

This is how I made it….
Salad:
1 large box of organic mixed greens
1/2 cucumber (peeled and chopped)
1 bag of dried cherries
1 cup of chopped pecans
1 cup of swiss cheese finely shredded (you could also use a crumbled cheese)
Good Seasons Dressing:
1 packet of Good Seasons Italian dressing mix 
~Make according to directions using white vinegar and vegetable oil then, add 1 Tbsp of sugar and 1 Tbsp of Parmesan cheese. Shake well, then toss in the salad! 
Enjoy! 
~Janelle 
Signature

Rolo Pretzel Sandwiches and Turtles


Here is an easy and YUMMY recipe for the holidays…the perfect mixture of sweet and savory! You can add these little treats to a cookie tray, place them in a Christmas box with tissue paper as a gift, or have them out in candy dishes for Holiday company! I am showing two ways to make them below. 
(My children prefer pretzel sandwiches) 
I bag of Rolo candies, 1 bag of square pretzels, 1 small bag of pecan halves
(I purchase my pecans at Marc’s because they are less expensive there)
Simply place pretzels on a cookie sheet and unwrap Rolos and place on top
Place these in an oven heated to 350. Let the chocolate melt slightly for 5 mins and take out. 
Place another pretzel on top! (I added sprinkles)
To make “turtles”,  simply place a pecan halve on top.
Treats for the children who are coming over tonight! 
Can’t forget the grown-ups! MMMmmmm….

Rolo Pretzel Sandwiches/Turtles


1 Bag Rolos
1 Bag square pretzels
and/or
1 Bag pecan halves
(sprinkles)


Preheat oven to 350. Lay out pretzels on a cookie sheet, place Rolos on top of each pretzel. Place in oven for 5 mins. Take out and gently press pretzels/pecans on top. Decorate with sprinkles if desired. Place in refrigerator on cookie tray for 1 hour to set.


Enjoy!
~Janelle 


I am participating in Tempt my Tummy Tuesdays @ At the Well, and Tasty Tuesdays @ Balancing Beauty and Bedlam. To see more recipe ideas, please visit these lovely ladies sites! 


Signature

Beef Stew

This stew is sure to please your family…it is a hearty meal in itself! The meat is so tender and the gravy pairs perfectly with crusty french bread. This one is a keeper, Friends! Enjoy!
~Janelle 
Stew beef, oil, broth, corn starch, garlic powder, paprika, onion, green beans, carrots, celery, salt, pepper, (sugar &Worcestershire)
“Prep your veggies”
My little guy helping (I just started letting him work the stove!)
Brown meat in oil
Add all the ingredients right in the pot
Cover and let simmer for 1 hour
Take 1/4 cup of broth out of pot
Add the cornstarch to the broth to make a paste (rue)
Simply put the paste into the pot of stew and let it thicken! 
A VERY delicious meal! OH YUM…a winter comfort meal for sure. 
Beef  Stew
2 lbs stew beef (I use chuck)
2 Tbsp vegetable oil
2 cups beef broth
1 Tbsp Worcestershire sauce
1 tsp garlic powder
1 onion sliced
1 tsp salt
1 tsp sugar
½ tsp paprika
1 cup carrots
1 cup celery
2 cups fresh green beans
2 Tbsp cornstarch
Heat oil in a large pot (I use my large wok). Brown beef, then add broth ,Worcestershire, garlic powder, onions, salt, sugar, pepper, and paprika, carrots, celery and green beans. Cover and let simmer for 1 hour. Remove ¼ cup of broth and add 2 Tbsp to make a paste. Add paste to the stew and stir until thickened.  Serve with bread to dip! MMmmm….


I am participating in Tempt my Tummy Tuesdays @ At the Well, and Tasty Tuesdays @ Balancing Beauty and Bedlam. To see more recipe ideas, please visit these lovely ladies sites! 
Signature

Soft Sugar Cookies with Homemade Frosting


Please come visit me at  www.womenlivingwell.org ! I am sharing a very special recipe this week…from my family to yours, enjoy!
 ~Janelle
Signature

Finger Jello (the secret revealed!)

My mother -in- law is such a wonderful grandma to my children…she is the kind of grandma that reads, plays barbies, let’s the kids do her hair, and yes….the kind that makes them their favorite thing to eat EVER…Finger Jell-O! 
A few years ago I was asked to make Finger Jell-o for my son’s school…(red and green for Christmas). I had never actually made Finger Jell-O, so I read the back of the Jell-o package and made it per instructions….when it was “set” I realized that it was very subpar to my Mother-in-Law’s Finger Jell-O that my kids love so much! Hmmm…what did I do wrong?! My “Jigglers” were really soft and were not staying together! Agh! What was I missing?! How hard could this be?! (haha)
Here is the trick to making this silly food….it is sure to put a smile on your children’s faces.

Finger Jell-O

3 small boxes of Jell-O
4 envelopes of Knox gelatin (the secret!)
4 cups boiling water
Mix all together and place in a 13×9 pan and refrigerate until firm. Before cutting, dip the bottom of your pan in warm water
Christmas Tip! Pour green (lime) Jell-O into tree molds for a festive treat for the children! 
(photo/item from www.gostores.com)
Enjoy!
~Janelle
Signature

Oven Baked Macaroni and Cheese

There are so many different ways to prepare Mac n Cheese…different cheeses, different methods of cooking, even different noodles! This is my family’s recipe…it is very simple, creamy, and oh so yummy! This dish is made at most of our family gatherings because it is easy to double. (I can bet it will be served as a side at Grandma’s this Christmas)  Enjoy!

Melt together butter, cream, milk, salt and pepper over med heat
Add Velveeta 
Stir well until melted 
In boiling water, add 2 cups of dry macaroni and cook until al dente (soft/firm- not mushy) 
“Pam” a dish with high sides (DO NOT use a 9×13 pan) 
Drain macaroni (Do not rinse!)
Add macaroni into pot with cheese sauce and stir (it will seem runny, but it thickens as it bakes)
Place uncovered in oven set at 350 and bake for 35-45 mins
AHhhhhhhh…..Comfort Food bliss!!
Enjoy!
 
 
Oven Baked Macaroni and Cheese
 
Author: Janelle Nehrenz
Prep time:
Cook time:
Total time:
Serves: 10
Ingredients
  • 16 oz brick Velveeta Cheese
  • 1/2 cup butter (1 stick)
  • 2 cups milk
  • 1 tsp salt
  • 1/2 tsp pepper
  • 2 cups dry macaroni
Instructions
  1. Melt butter with, milk, salt and pepper.
  2. Add Velveeta cheese, melt and stir together.
  3. Boil macaroni in water until al dente, drain and add noodles to cheese sauce in pot. Place all ingredients into a greased baking dish with high sides.
  4. Cook uncovered for 35-45 mins in a 350 oven.


I am participating in Tempt my Tummy Tuesdays @ At the Well, and Tasty Tuesdays @ Balancing Beauty and Bedlam. To see more recipe ideas, please visit these lovely ladies sites! 
Signature

Mickey Waffles!

Oh, are these ever cute…and tasty too! I don’t have a Mickey waffle maker (Christmas gift, hint?), but I will try this recipe out on my regular waffle iron. These are moist on the inside and crispy on the outside…the best combo for the perfect waffle. Enjoy!

Mickey Waffles

4 eggs, separated 
1 cup milk 
2 tsp baking powder
1/2 tsp salt (optional)
2 cups flour 
1/4 cup butter or margarine, melted 
1 tbsp sugar
1 tsp vanilla (optional)
Beat egg yolks and sugar in a bowl until light. Add cooled melted butter, milk and vanilla extract. Add flour, baking powder & salt, beat well. Beat egg whites until stiff and gently fold into batter. Bake and serve.

For perfect Mickey waffles use a Mickey Mouse Waffle Maker.

recipe from 
Signature

Ain’t no thang but a……Turkey Leg?

As we were walking through The Magic Kingdom I couldn’t help but notice people walking around “chowing” on HUGE Turkey Legs… I thought to myself..”Well, it was just Thanksgiving…maybe it is a seasonal thing?” Then, a few days later we went to Animal Kingdom and noticed a stand selling “Smoked Turkey Legs”…with a huge line of hungry Carnivores! For some reason, it tickled my funny bone…so, I took a few photos, had a conversation with a happy customer (who gets Turkey legs EVERY time he comes to Disney), and googled “Disney Turkey Legs”when I got back to the condo….so, here we go on a very silly quest of discovering the story behind this strange concession!

This is not your typical “corn dog” concession stand, My Friends! haha!  
One of many customers.  
A repeat customer!

Here is the story behind it all…..

If you have ever had one of these Turkey Legs…please post! Would love to hear how they are…I may cave and get one tomorrow! lol! This just cracks me up! ~ Janelle

Signature

Main Street Confectionery (Magic Kingdom)


Here we are at the Magic Kingdom! I thought this was going to be a sweet/quaint family photo..but it turned out even better, my children’s personalities are in it! haha. This is as good as it gets! Oh, the glory days! 

The Main Street Confectionary! It is the most amazing candy store I have ever been to..a VERY sweet step back in time. 
Here we have ladies making some fabulous treats…there is a nostalgic feel everywhere you look ..even their uniforms have that 1940’s look to them…absolutely love it. 

Aren’t those Mickey/Minnie apples the cutest?! My hubby caved for the massive oreo in the back and I bought some chocolate peanut butter fudge. MMM!

Festive Christmas treats!

Mickey rice crispies and turtles
The Kid’s Choice!

A recipe from Main Street Confectionery 


Ingredients:
1 cup Butter
1 tablespoon Brown sugar
1 cup Sugar
2 large Eggs
1/4 teaspoon Vanilla
1/4 cup Cocoa powder
1 1/2 cups Flour
1/4 teaspoon Baking soda
1/4 teaspoon Salt
18 oz. Semisweet chocolate chunks

Method:
Preheat oven 375 F. Cream butter, sugars, vanilla, and cocoa powder. Stir in remaining ingredients and blend well. Refrigerate 30 minutes. Drop dough by rounded teaspoons onto ungreased cookie sheet about 2″ apart. Bake until cookies are set, 5-8 minutes. Cool slightly and remove from pan. When making large cookies, press down slightly on cookie dough to help cook more evenly. Bake slightly longer, 8-10 minutes.

The Castle decorated with Christmas lights…it was breath taking. 

Jesus Christ..The Creator of imagination!

Thanks for letting me share with you a window into our family vacation…there is much more to share, but now it’s time to say goodbye! lol! 
“See ya real soon! “
~Janelle

Signature

Chef Mickey’s Breakfast Pizza!

Hi, My Friends! Come visit me over at Courtney’s @ www.womenlivingwell.org to see one of my favorite Chef’s recipes! (haha) I will post more about what happened on our trip later in the week! “See ya real soon!”

~Janelle
Signature