Archives for October 2011

Relevant 11

Amazing.

Awesome.

One of the best weekends of my life.

True friendships formed lovingly by God.

He was present.

Tears of happiness, conviction, and joy literally streamed.

I’ve never laughed so hard…seriously.

It was such an honor to be present.

This weekend was just. so. dear. to. me.

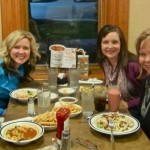
Some of the girls at Bob Evans the first night. Clare (Peak313) Ruth (The Better Mom) Darlene (Time Warp Wife). I remember loving listening to Darlene’s sweet Canadian accent.”Excuse me, Waitress…where’s the washroom?”

My fitness guru with her chocolates! love it!

I HAD to get this photo! What do bloggers do when they FINALLY get together in person?! LOL..they blog! Lord…help us.

Swag- and a lot of it. Wowsa.

Such a dear picture to me. You may know that I co-led the study “The Ministry of Motherhood” over the Summer at Courtney’s house. One of the most heartfelt Christian writers of our time...Sally Clarkson. She is just as kind and loving in person. She took the time to pray with me this weekend. A true class-act woman of the Lord. PLEASE visit her at www.itakejoy.com and read every one of her books. 🙂

Jessica ( Muthering Heights) and I- I had the blessing of her company last night at dinner. What a true sweetheart…she radiates the love of the Lord in that beautiful smile of hers. Loved getting to know her.

Courtney and Ruth– Adorable!!


Joy (Grace Full Mama), Courtney and Clare. Was this before or after we cried until we laughed last night?

A HUGE thank you to all the ladies involved making Relevant the success that it was. It really was such an honor just to be there witnessing all that God is doing. A special thank you to Sarah Mae from Like a Warm Cup of Coffee for carrying out God’s dream for Christian Bloggers to be under one roof together in harmony.


Signature

A Child’s Ten Commandments

Isn’t this shot absolutely priceless. My timid little girl actually did it..she went on stage in front of a gymnasium packed with tearfully proud parents and raised her sweet little arms in excitement. She had just graduated pre-school!
 
I know that in 13 years from now, I will look at this very photo of my daughter and well up with tears. My little girl… my high school graduate.  I will ask myself “Where did this time go? If I had it all to do over again, what would I do differently? What should I have enjoyed more?” 

Signature

Swag Bags!

Clare from Peak313 and I are having a BLAST going through our SWAG bags! Can you believe how generous these sponsors are at Relevant?! Check out some of these amazing complementary items we got just for being here….we feel very blessed!


What’s inside our swag bags-

The Resolution for Women (From the creators of Fireproof and Courageous) Shirer-book and blanket

Adventures in Odyssey -The Imagination Station  “Showdown with the Shepherd”.

Adventures in Odyssey -The Imagination Station “Problems in Plymouth”

Gabby’s Choice “Rice n Simple”

Virgin Coconut Oil – More than 100 personal testimonies on the healing power of Virgin Coconut Oil. Brian and Marianita Jader Shilhavy

A craft from Marie-Madeline Studio

A t-shirt from www.aboutone.com

I Am In Here- The journey of a child with autism who cannot speak but finds her voice. by: Elizabeth M Bonker and Virginia G. Breen

Star Cookie Cutter with recipe cards from Focus on the Family

Help Haiti CD

a HUGE candy bar from Bright Ideas Press

A BEAUTIFUL necklace from The Vintage Pearl

Remembering Christmas by Dan Walsh

What Women Fear by Angie Smith

Grace Based Parenting by Dr. Tim Kimmel

What’s in the Bible? Phil Vischer

A beautiful necklace and the actual Swag Bag from Blessings Unlimited

And much more….

A HUGE thank you goes out to these sponsors for supplying us with all these amazing treats! It has made our trip that much sweeter. Can’t wait to start reading…

Signature

Relavant 2011 Girls

Hi Ladies! My friends and I are having a blog bash over at Women Living Well! Come check it out! You can see how our week is going at the Relevant Conference though out the week here, so come check it out!

Please come join us, link up, and join in the fun!

Signature

Homemade Whipped Cream

There is nothing better than homemade whipped cream…especially for the holidays. It takes very little time and effort, but makes a big difference in taste and texture. Don’t believe me how easy it is? Here we go…

This is in the same aisle as your coffee cream

Pour in large bowl

Start beating with a mixer (high speed!)

Add 1/4 cup of sugar  and 1 tsp of vanilla for each pint you use.

Beautiful- the perfect texture!

Who wouldn’t want homemade whipped cream on pumpkin pie? It’s the best!

Homemade Whipped Cream
Prep time: 5 mins
Cook time: 5 mins
Total time: 10 mins
Serves: 8
Ingredients
  • 1 pint whipping cream
  • 1/4 cup sugar
  • 1 tsp vanilla
Instructions
  1. Pour whipping cream in a large bowl and beat well.
  2. Add sugar and vanilla.
  3. Beat until desired consistency.


Signature

Skillet Potatoes

This is a very simple recipe you can make during the weeknights. I use peanut oil to fry potatoes because it makes them crisp! You can make this side dish for dinner or breakfast. If making for breakfast let me suggest to fry bacon in a skillet, then fry your potatoes in the bacon renderings. Then, crumble the bacon on top. *This is a naturally gluten/dairy/egg free recipe.

Just like apples, not all potatoes are created equally. I chose Yukon Gold potatoes for this recipes because they are great fried and you don’t have to peel them!

Per Produce Pete:  Yukon Golds are a sweet-tasting potato with a golden color. Retains its color when baked, boiled or fried. The Yukon Gold potato should be cooked whole and without peeling. The nutrients in potatoes are close to the skin and when cooking whole it retains most of the nutrients. Once cut, sprinkle with lemon or apple juice to keep from browning. When baking don’t foil wrap–it creates wet, gummy texture inside the potato.


Wash and slice (I use a slicer) 8 Yukon Gold potatoes and one Vidalia onion.No need to peel the potatoes!

In a large skillet, add peanut oil and heat on med-high on the stove. Add potatoes and onions. Season.

I use PLENTY of this! It has garlic, sea salt, and black pepper. If you don’t have this- no worries! Just add plenty of seasoned salt, pepper, and some garlic powder to your desired taste.

Let cook for 2 mins, then flip- continue to do this until potatoes are tender (about 30 mins) I wish you could smell the aroma from these potatoes through this photo right now, Ahhhh… You will NOT be able to resist sneaking a bite at this point- especially the crunchy ones! YUM!

This was my first gluten-free and dairy-free meal. Not so bad is it? See??? Don’t you feel bad for me! lol. I simply made Marvelous Meatloaf with gluten-free breadcrumbs. To make this meatloaf even better, get your ground chuck from the butcher. I can definately tell a difference.

In case you were wondering- I used a bag of frozen sweet peas, added water and let simmer per directions. Then, drained the water…I added 2 tbsp of Earth Balance (butter replacement), 1 tsp of sugar, and salt and pepper. Tasty!

Now…back to those potatoes…

Skillet Potatoes
Prep time: 10 mins
Cook time: 30 mins
Total time: 40 mins
Serves: 6
Ingredients
  • 8 Yukon Gold Pototes
  • 1 Vidallia Onion
  • 3 Tbsp Peanut Oil
  • Garlic Pepper or seasoned salt/pepper/garlic powder -and plenty of it to your liking.
Instructions
  1. Wash and slice potatoes (no need to peel), slice onions.
  2. Heat skillet on medium high heat and add peanut oil.
  3. When oil is hot add potatoes and onions and season.
  4. Let sit for 2 mins and flip.
  5. Continue doing this until potatoes are tender.
  6. Season again to your taste.
Notes

For a breakfast side dish, fry 8 slices of bacon in the skillet first (omit the peanut oil). Take out bacon and place on a paper towel covered plate to let cool and crisp. leave renderings (fat) in skillet and add potatoes/ onion and seasoning. Cook as directed above. Crumble bacon and add to potatoes.


Signature

Feasting in Fellowship 10/21

 Happy Friday Ladies!

Are you doing anything fun over the weekend? We will be taking the kids to the circus -then the next day dressing up like a circus ourselves for our church’s trunk or treat! I’ll post pictures! Can you guess what I’m going as? lol.

Wherever this weekend takes you-I pray you have a blessed time with your family and friends. Here are some recipes that might make for a “sweeter” weekend!

Courtney from Women Living Well is sharing my Pumpkin Trifle recipe – I actually brought this very one over to her house. It is so easy to make, light, and tasty!

Courtney will be hostessing an ULTIMATE Blog Bash next week as she heads out to be a speaker at Relevant! You won’t want to miss next week on her blog! Wohoo! I love a party!

Friday’s Top 3 Recipes


Mini Pumpkin Pies
Made By: Kimberly’s Notebook


Cookie Stuffed Cookies

Made By: Somewhere in the Middle

Cookie-Stuffed Cookies

Easy Baked Chicken Nuggets

(Adaptable for food allergies)

Made By: A.Whole.New.Mom (Amen Sista)
Easy Chicken Recipe

It’s a Feasting in Fellowship Link up! Please link up AS MANY recipes as you wish!!! I love seeing what YOU have cooking! Please make sure to grab my button (on the side bar) and place it on the post you share. Thank you so much and enjoy your weekend!

Signature

Gluten-free, Dairy-Free, Egg-Free- Why Me?

Many of you have seen on my Facebook page that I was just told by my doctor that I have food allergies. When she informed me of this, I thought “No big deal.. It’s probably nothing major..I bet it’s shellfish and I don’t even eat shellfish”.  As she gave me a list of foods I was tested for, 3 lines were much longer than all the others- chicken eggs, most dairy, and wheat. The first thing I asked was “Is wheat ….like the wheat in FLOUR?!” Uhhh..yeah. That would be correct. Ok. Ok. Ok. Let’s back up here…what on earth CAN I eat? Cooking is my ministry…it’s what I enjoy, it’s what I’m good at, it’s what I teach my children, and (many of you may know this) I have a cooking blog! I left with a bittersweet feeling in my soul…

“He will have no fear of bad news; his heart is steadfast, trusting in the LORD” -psalm 112:7.

After I got home from my doctor’s appointment I started praying and realized that even though I have to alter what I eat, I do not have to give up my ministry. In all actuality, I have been calling my ministry a ministry….but I have always been privileged in indulging in all the treats I’ve made. Now, I will have to pray a lot hard, ask for strength a lot more, and give without getting anything in return..without a reward. Isn’t that a beautiful thing? Isn’t is such a small cross to carry for what Jesus did for me?

“Then he said to them all ” Whoever wants to be my disciple, must deny themselves, and take up their cross daily and follow me” – Luke 9:23

It has been a week now (hold the applause) since I have had any of my “forbidden foods” – I can honestly say that it hasn’t been as hard as I would have thought! I haven’t craved the sweets nearly as much as I would have imagined… What’s more is that I can breathe….AHhhhhh….I have had “shortness of breath” for years and have never known why. I can’t believe that it was something so simple like a food allergy! And like a fool as I was eating my delicious scones, I was wondering why I couldn’t breathe! The shortness of breath also made me very tired. I am praising God that I found out what the problem was….even if it was ironic that it was something I held dear to me.

Going forward I will be updating archived recipes with GF/DF needs as my time permits. I will also be adding Gluten Free/Dairy Free/Egg Free recipes that I make! I will not, however,  turn into a Gluten Free/Dairy Free only blog  as I will continue on with my “in person” meal ministry to those without dietary guidelines . I will continue to share cheesy, buttery, and full of gluten recipes on Comfy in the Kitchen . The only thing that will change is that Comfy in the Kitchen will be more accommodating to those who have the same dietary challenges as I do!

I refuse to let this challenge get the best of me.

“I can do everything through him who gives me strength” -Philippians 4:13

Thank you for all of your encouragement, love, support, and advice. I can’t tell you how much it has meant to me! I am also so surprised at how many people have food allergies! I had no clue.

Wondering what I am going to miss the most? (and don’t tell me I can still eat it- it is not the same -ha, ha)  Pizza!!!!!!


Signature

Give Thanks Calendar Craft


I was talking with my dear friend Katina the other day and she mentioned that she just finished making a “Give Thanks Calendar” with her children. Not knowing what this was, I was intrigued! She was so kind to put together a post for me to share …..I will let her take us though this beautiful craft. 

She writes:

I decided this year that I wanted to start a Thanksgiving tradition with my children.  I was inspired to create this “Give Thanks Calendar” for the month of November.  It’s so easy sometimes to focus on negative things and complaining, so I wanted to do something to help turn that mindset around for my family and have thankful attitudes.

  “Give thanks in all circumstances, for this is God’s will for you in Christ Jesus.”

—1 Thessalonians 5:18

I went to the local craft store and bought one yard of utility natural burlap fabric, an assortment of colored felt, three packs of Prestofelt (felt with a sticky back), and poster strips.  You can use any kind of fabric…..I chose utility fabric because I like the look of it and it’s really cheap!  It cost about $14 for all of the supplies.

Cut out a 4×4 square and trace with a marker on the colored felt.

Depending on the ages of your children, this is a great step to have the kids help out with.  I traced all the squares and my children cut them out.

Make 30 squares for the month of November.

I drew my numbers by hand and traced them onto the back of the Prestofelt.  To make it easier, you can print off numbers from the internet or use a cricut machine if you have access to one.  *Make sure you trace the numbers backwards on the back of the Prestofelt.

Peel the numbers off and place them on the 30 squares.

Before you glue the squares on, center them on the fabric to your liking.  I chose to make mine more vertical because of the space on my wall.  Cut off any extra fabric.

The great thing about utility fabric is that you can fray the ends to give it a different look.  Start on the bottom and take a couple strings and pull upwards.  Or you can leave it as is…whichever you prefer!

I used tacky glue to glue each pocket on.  If you’re using utility fabric, make sure you put a piece of cardboard or paper underneath the fabric so that the glue does not get on the surface under the fabric.  Just keep moving the cardboard/paper along the way as you glue each pocket on, so that they don’t adhere to the piece of paper underneath.

I used the Prestofelt again to cut out the words ‘give thanks’.  Make sure you trace the letters backwards on the back of the Prestofelt.

Make 30 squares of paper to insert into every pocket with your family’s names on each of them.  For each day in November, you will pull out the “thankful” paper and each family member will write down what they are thankful for.

Once everything is dried, find a spot that works for your family to hang up the calendar.  I used Damage-Free Hanging Poster Strips to apply the calendar to the wall, so that it can easily be removed.

I will be praying that this will be a blessing to each of your family’s and help each of us to get in the habit of being thankful every day of the year!!

“Enter his gates with thanksgiving and his courts with praise; give thanks to him and praise his name.”

                   –Psalm 100:4

Dear Katina, I can’t thank you enough for taking the time  and energy to share this with me and all the women out there  reading. What an important reminder it is to us moms to take the time to teach our children the beauty of thanksgiving. There is so much to be grateful for in our lives and so often we take advantage of it all because of the hustle and bustle…children and grown-ups alike.  Love you!

I hope you ladies will enjoy this craft with your children in the month of November!!!! This is the perfect time to start gathering up supplies. I will be saving all the cards my children write out and placing them in their baby books….what a great craft.

This craft is featured on All FreeHolidayCrafts.com


Signature

Semi-Homemade Cannoli’s

Were you wondering if I would ever get to this recipe? I do, afterall, claim to be part Sicilian…


This is a very traditional cannoli filling that happens to be SO simple to make at home.  Add or subtract from it -make it your own, have fun. In America, we tend to change original recipes up a bit-but I hands down prefer the Sicilian Ricotta cheese filling in comparison to some custard fillings we have here in the States.

I purchase pre-made shells, which is why I call these “semi-homemade”…you can buy these at an Italian market or in the Italian aisle at your local supermarket.

If you have never had a Cannoli- I would compare it to a cheesecake..very rich and VERY delicious…I know many who simple cannot resist their temptations when they are in the presence of a homemade Cannoli…enjoy!

Place whole milk Ricotta cheese, Goat cheese, powdered sugar, 1/4 tsp lemon zest, 1 tsp vanilla in a food processor.

Blend well. This is a very rich and creamy texture.

Add mini chocolate chips (some like to add maraschino cherries)

Pulse it a couple of times…doesn’t hurt a thing.

Spoon filling in each pastry shell.

Add more chocolate chips to the ends and sprinkle with a garnish of powdered sugar “Così delizioso”!

Semi-Homemade Cannoli’s
Prep time: 15 mins
Total time: 15 mins
Serves: 8
Ingredients
  • 1 cup whole milk Ricotta cheese
  • 1/4 cup goat cheese
  • 1/2 cup powdered sugar (and more for garnish)
  • 1/4 tsp lemon zest
  • 1 tsp vanilla
  • 1 cup mini chocolate chips (and more for garnish)
Instructions
  1. Blend everything (but chocolate chips) in a food processor.
  2. Add mini chocolate chips and pulse.
  3. Spoon filling into pre-made cannoli shells.
  4. Add additional mini chocolate chips to the ends of the cannoli.
  5. Dust with powdered sugar.


Signature

Best Ever Snickerdoodles (Great American Copy Cat)

When last minute company is heading over, what do you make? Snickerdoodles! When you are fresh out of chocolate chips and your teenage son’s friends come over to “hang out”, what do you make? Snickerdoodles! When it’s cold and rainy outside and you are in the mood to bake something simple with the kidos…what do you make? Snickerdoodles!

Ladies, this is my ALL-TIME favorite Snickerdoodle recipe. There is NOTHING that smells better than these cookies baking…many a candlemaker has tried to put this smell in a jar and sell it, but alas…the real thing is just unmatchable. The mixture of butter, vanilla, cinnamon and sugar is good enough to make anyone’s mouth water! YUMMmmm….

And here is the “Top Secret” recipe…Shhhh…

In a large bowl, add butter, sugar and brown sugar

Mix well with mixer

Add an egg and vanilla

In a bowl mix together flour, salt, baking soda and cream of tartar.

Mix together

*chill* for 30 mins in the refrigerator (do not skip this step, my Dears). Scoop into Tablespoon sized cookies.

Roll in cinnamon and sugar

Bake in a 300 oven for 14-16 mins (they will still be gooey) The key is to leave them on the baking sheet for a couple of mins so they will continue to bake. Then, place them on a cooling rack.

Wanna bite??? These are dense and buttery and ohh so good.

Best Ever Snickerdoodles (Great American Copy Cat)
Prep time: 10 mins
Cook time: 14 mins
Total time: 24 mins
Serves: 16
Ingredients
  • 1/2 cup (1 stick) softened butter (not melted)
  • 1/2 cup granulated sugar
  • 1/3 cup brown sugar
  • 1 egg
  • 1/2 tsp vanilla
  • 1 1/2 cup flour
  • 1/4 tsp salt
  • 1/2 tsp baking soda
  • 1/4 tsp cream of tartar
  • Sugar and cinnamon for rolling (1 cup sugar and 1 tsp cinnamon-mix)
Instructions
  1. Preheat oven to 300
  2. Mix butter, and sugars together.
  3. Add egg and vanilla and mix well.
  4. In a separate bowl blend flour, salt, baking soda and cream of tartar.
  5. Add to wet ingredients and mix until just combined.
  6. Place batter in refrigerator for 30 mins (this is the MOST important step)
  7. Mix sugar and cinnamon in a small bowl for rolling
  8. Scoop dough by the Tablespoonfuls and shape into balls-roll in cinnamon and sugar
  9. Place on un-greased cookie sheet
  10. Bake for 14-16 mins
Notes

Cookies will be slightly gooey-leave them on the baking sheet after they are finished in the oven…they will continue to bake. Then, place on cooling rack.

Signature

Feasting in Fellowship Friday’s Link Up (10/14)

Happy Friday Girls!

Join me over at Women Living Well where Courtney shares how to make my Gourmet Caramel Apples ! While you are there, please browse around!  I especially enjoy watching the videos along the sidebar…God speaks such wisdom through this sweet friend of mine. Have a great weekend and remember  “This is the day that the Lord has made, rejoice and be glad in it!” ~Psalm 118:24

Friday’s Top 3 Recipes…


Pumpkin Bars

Made By: Grace Full Mama

*LADIES not only is this an awesome recipe-this is an awesome blog. Joy is a missionary from Indonesia -she and her family are just stunning. She is such a fun and spirited girl. Check her out!


Turkey Pinwheels

Made By: My Heart’s Desire

Apple Nachos

Made By: Cup of Joe with Jeanie

Do you all even know how thankful I am that you take the time to link up to Feasting in Fellowship Friday’s? I just want to give you a big hug right through this screen! Please keep those recipes coming- post as many as you like. All I ask is that you add my button (located on my side bar) to your post. Much love goes out to you!


Signature

Low Fat Pumpkin Trifle

(this is a guest post from www.womenlivingwell.org)“I brought this dessert to Courtney’s house when she hosted a wonderful Thai meal last week. I had so many ladies come up to me and ask me for the recipe….so here it is! A beautiful, delicious, festive and low-fat (yes, I said it!) dessert for the holidays!


This is a recipe I used from my “Taste of Home Entertaining” book. It is the most requested recipe from “Taste of Home’s, Light and Tasty ” magazine.

I pray you have a very Happy Thanksgiving! May God bless all of you who are preparing meals for your loved ones-may He give you strength, time management, and the ability enjoy sweet fellowship on this special day.”


Start off by making the cake part of the Trifle: Combine spice cake, 1 egg, water and mix well
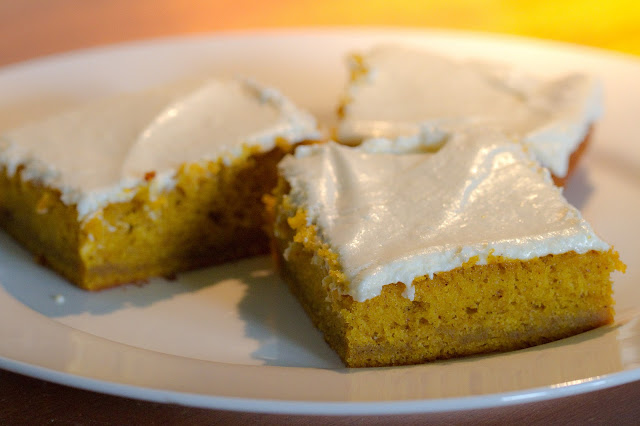
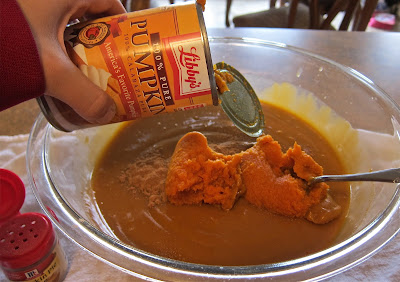
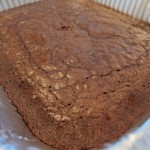
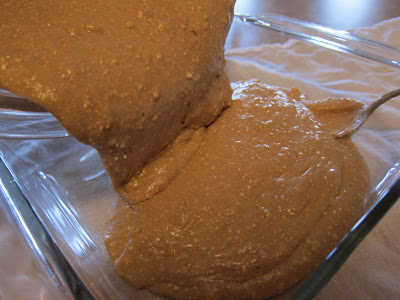
Pour into an ungreased 8 inch baking dish and bake at 350 for 35-40 mins until well set. Let cool.

Then, to make your filling: 4 butterscotch instant pudding mixes, 1 15 oz can of pumpkin (you can use EASY pumpkin mix -”with the spices”, or you may add 1 tsp of pumpkin spice to this step)

FIRST make just the pudding- beat the pudding mixes with the milk

It will begin to thicken -let set for about 5 mins until it is of pudding consistency.

Add pumpkin and spices (if applicable)and stir well (you may use an electric mixer on low if you desire)

Get out your Trifle bowl and start layering (you will need to get out your Cool Whip at this time!) Begin with the Spice Cake- crumble with your fingers and lay at the bottom of the bowl (if you don’t have an “official” trifle bowl-have no fear, I used a regular old mixing bowl for years until I found this one at JCPenny Outlet-Wohoo!)

Spread your pudding/pumpkin mixture on top and then crumble more cake on top of that

Add in a layer of Cool Whip

Do as many layers as you can- I topped mine with Cool Whip and dotted with the pumpkin mixture and sprinkled extra cake on top. You are going to LOVE this!!!!!! OH YUMMM!!!!


Pumpkin Trifle(18 servings)Cake:

1 box Spice Cake

1 ¼ cups water

1 egg

*Mix all ingredients and bake in an 8×8 pan at 350 for 35 mins or until set. Cool on stove or wire rack.

Pudding Filling:

4 cups skim milk

4 packages (1 oz each) instant butterscotch pudding mix

1 can (15 oz) pumpkin mix- you can use EASY, but eliminate the spices below

1 ½ tsp Pumpkin Spice (or 1 tsp cinnamon, ¼ tsp of each: ginger, nutmeg and allspice)

* In a large bowl mix milk with pudding mix. Let sit until it thickens (appx 5 mins). Add pumpkin and spices and mix well.

1 carton (12 oz) light whipped topping

Layering Process:

In a Trifle bowl (or any large bowl) layer:

1. A fourth of the cake crumbled with your hands

2. Half of the pumpkin mixture

3. A fourth of the cake crumbled

4. Half the whipped cream

5. Repeat the layers

6. Garnish with whipped topping and cake crumbs

7. Refrigerate until ready to serve.

Signature

Quickest and Easiest EVER Cheese Tortellini Soup

This is a tasty soup that takes ZERO prep! I think it may be the easiest soup to make ….ever. It doesn’t even seem right to post this recipe, but sometimes it’s the easy little recipes like this one that save us during the week. I never said I was a chef in the kitchen…just “comfy”. I made this meal for dinner tonight…we were all kind of feeling a bit under the weather. I felt more like laying down than cooking so I wanted to make something quick and comforting. I’m so glad I had these items on hand! My children LOVE this soup…my mom always makes it for them.

One large container of refrigerated “Three Cheese Tortellini” and one large can of reduced sodium chicken broth. I also add 2 cups of water into the broth.

Place tortellini, broth and water in a large pot and heat until boiling. Let simmer for appx 8 mins.

Top with parsley, fresh cracked pepper, and parmesan cheese…That is it. Can it get any easier?

I served it with a simple tossed salad drizzled with olive oil and balsamic and seasonings topped with a broiled chicken breast. This dinner took me about 15-20 mins tops.

Quickest and Easiest EVER Cheese Tortellini Soup
Cook time: 8 mins
Total time: 8 mins
Serves: 6
Ingredients
  • 1 Large container of Three Cheese Tortellini (refrigerated)
  • 1 Large (48 oz) Reduced Sodium Chicken Broth
  • 2 Cups Water
  • Pepper/Parmesan Cheese/Parsley for garnish
Instructions
  1. Place Tortellini, broth and water in a large pot. Bring to a boil and let simmer for appx 8 mins until tender.

Signature

Gourmet Caramel Apples (at home)

A very dear friend of mine asked if I would entertain the idea of making caramel apples with her! I had never made them before…but I am ALWAYS up for a food challenge, so of course I obliged! It may have helped that I absolutely LOVE caramel apples and I was up for some fellowship 🙂 We had a wonderful time together and made some pretty amazing apples! Here is our story….

(We multiplied the recipe for a bake sale, I am giving you a recipe for 6 apples- you may multiply as desired)


Granny Smith Apples, Sugar, White Corn Syrup, Sweetened and Condensed Milk, Salt, Butter, Vanilla, Parchment paper (Skewers- I purchased nice ones at Jo-Ann Fabrics)


Wash your apples thoroughly…get as much wax off as possible.  


The making of the caramel sauce: In a heavy saucepan combine sugar, corn syrup, milk, and salt mixing well.


keep mixing…the color changes, like so.


And here we have caramel! Who would have thunk it was so easy?! 


Here is the fun part…set up your “apple dressing buffet” We had nuts, crushed Butterfinger, white choc chips, mini M&Ms, melted chocolates, Heath, and marshmallows. (I would suggest to pick no more than 3 to start off with) 


Lay parchment paper down and butter


After the caramel cools for about 5 mins….stick your apple at the top end and start dipping and rolling in your toppings….

(This is Butterfinger)


This one was splashed with chocolate and dipped in Heath..(YUM)


My kidos favorite…the mini M&M monstrosity! 


Beautiful! I just love the sweet and savory flavors of a caramel apple…and the fiber, ahh yessss….apples have fiber. This is a healthy recipe right? (hehe)


Gourmet Caramel Apples (at home)
Prep time: 10 mins
Cook time: 40 mins
Total time: 50 mins
Serves: 6
Ingredients
  • 6 wooden skewers
  • 6 Medium Granny Smith (green apples)
  • 1 cup sugar
  • 3/4 cup white corn syrup
  • 1 can sweetened condensed milk
  • 1/8 tsp salt
  • 1/4 cup butter
  • 1 tsp vanilla
  • desired toppings & parchment paper
Instructions
  1. In heavy saucepan combine sugar, corn syrup, milk and salt mixing well.
  2. Cook over medium heat stirring gently but constantly until soft ball stage (if you are using a thermometer it will be about 230 degrees- but I go by color).
  3. This will take you about 30 mins.
  4. Remove from heat and cool for about 5 mins and stir in butter and vanilla.
  5. Cool again about 5 mins- you then may begin coating caramel over apples to cover fully…then dip in your desired topping.
  6. Place on buttered parchment paper…when finished with all apples, transport to dish and cool in refrigerator for 2 hours before enjoying!

Signature

Feasting In Fellowship Friday Potluck! 10/7

Happy Friday!!!

And a happy Friday it is…we are enjoying a beautiful Indian Summer in our neck of the woods! Oh, how I just love this weather. The sun is shining, the air is crisp, the leaves are changing color…it’s just BEAUTIFUL outside! My husband and I get to join our daughter on a field trip to a local pumpkin farm today…then he is off to golf with the guys (their last hoorah before the cold weather sets in). My son’s last football game is tomorrow and boy will I be glad to trade in our cold and rainy weather from last weekend for a warm sunshiny day! Wohoo! Go Broncos!

Wondering what to make for supper Sunday evening? Try these delicious Soda Pop Chops that my friend Courtney from Women Living Well is sharing today…take a trip to your local butcher today and marinate them tomorrow evening. They are SO good!

Friday’s Top 3 Picks!

Thanks to all who link up! I love to see what YOU have cookin!


Pumpkin Pie Spiced Nuts
Made By: Joyful Homemaking

Easy Chocolate Pie

Made By: Peonies and Butttercups

Special Seasoning Popcorn

Made By: Whole.New.Mom

Homemade natural popcorn seasoning recipe

Please link up as many recipes as you wish! All I ask is that you place my button (located on my sidebar) onto your post. I also love when you share Feasting in Fellowship with your friends…tweet and share away. The more the merrier! Thank you – have a blessed weekend!

Signature

Ghirardelli Award Winning Brownies


Ghirardelli Gluten-Free Brownies

(photo credit: Ghirardelli)


Oooohhh my!!!! These brownies are AHHhhmazing! Ladies, you have GOT to try these out! When I had my friend’s girls over for a mini cooking class, these are what we made for dessert. They told me they were the best brownies they have ever tasted! We couldn’t wait for them to cool, haha…who doesn’t love homemade brownies pipping hot out of the oven? They are irresistible.

Go grab a canister of Ghirardelli ground chocolate/baking cocoa and just follow the recipe on the back!

Ever notice just saying the word “brownie” makes ya smile? Try it…Brownnnnnieeeeee….MMMMMmmmm!


Preheat oven to 350, Using a spoon, stire eggs with sugar and vanilla; add butter.
Sift Sweet Ground Chocolate with flour, baking powder, and salt.

(I simply put it in a separate bowl and fluffed it with a fork. It worked.)

Stir into egg mixture; (you may add nuts and chocolate chips) Spread into a greased 8″ square pan.

Bake for 20 mins. Place pan on a cooling rack and let cool before cutting (if you can resist…I can’t). I used a throw-away pan because these went home with the girls. I prefer using a glass square pan if I’m making them for my family.

While the brownies were cooling, we made the frosting: butter, milk, Ghirardelli Cocoa, Confectioners sugar, salt, and vanilla.

It was ok…

KIDDING!!! It was AWESOME.

Ghirardelli Award Winning Brownies with Frosting
Prep time: 20 mins
Cook time: 25 mins
Total time: 45 mins
Serves: 16
Ingredients
  • 2 eggs
  • 3/4 cup sugar
  • 1 tsp vanilla
  • 1/2 cup butter, melted
  • 3/4 cup Ghirardelli Sweet Ground Chocolate and Cocoa
  • 2/3 cup flour
  • 1/4 tsp baking powder
  • 1/4 tsp salt
  • 1/2 cup chopped walnuts (optional)
  • 1 cup chocolate chips (optional)
  • Frosting:
  • 1/4 cup butter
  • 3 Tbsp milk
  • 1/2 cup Ghirardelli Sweet Ground Cocoa
  • 2 1/2 cups confectioners sugar
  • dash salt
  • 1/2 tsp vanilla
Instructions
  1. Preheat oven to 350
  2. Using a spoon, stir eggs with sugar and vanilla, add butter.
  3. Sift cocoa with flour, baking powder, and salt.
  4. Stir into egg mixture
  5. Add nuts and chocolate chips
  6. Spread into a greased 8″ pan
  7. Bake 20 mins and let sit on a cooling rack
  8. Frosting:
  9. Combine butter, milk, cocoa in a saucepan over low heat until butter melts
  10. Remove from heat
  11. Add confectioners sugar, salt and vanilla
  12. Beat until smooth
  13. Frost over top of brownies


Signature

Lasagna for 50 -Cooking for a CROWD!


This weekend I had the honor of cooking for the new members/ guests at our amazing church. I can’t even explain how much fun it was cooking for a crowd in our church’s new kitchen…plastic gloves, hair nets, disinfectant and all…I had a blast. Here are some photos of the day.

A HUGE Thank you to my friends Christina and Michelle for helping me with food prep and set up! Also, to Alice who runs the kitchen at the church- she is amazing. Thanks to the Stopp family and our church for letting me be part of this ministry!  Also, thank you to those who helped us clean up. 

My van was FILLED with food, drinks, vases…you name it.

Alice and me making a HUGE pot of Grandma Ruth’s Spaghetti Sauce! We also had ground chuck and Italian sausage cooking on the stove top.

2 large salads made with Romaine, tomatoes, olives, croutons, cheese and seasonings. We semi-homemade the dressing with Good Seasons, oil and Red wine vinegar, a little sugar, and parmesan cheese.

This mixer was amazing! It whipped up our Pineapple Fluff in no time at all! (I multiplied this recipe by 3)

Our Cream Puffs/Eclairs – these were purchased, placed in muffin cups and sprinkled with powdered sugar.

3 very large lasagna’s baking in the convection ovens. One was meatless-and was appreciated as some people didn’t eat meat at the event. That is something to always be considerate of when you are cooking for a crowd-meatless items.

GFS Garlic Toast- I was very impressed by this product. SO many people told me they smelled this baking in the oven while service was going on…YUM (not to mention easy)

Lasagna’s done! This also smelled delicious baking …

Our buffet warmer- this was a very convenient way to cart the warm food into the room. We filled it with water, turned it on and placed the pans of lasagna with covers on to keep warm. We also had room for the bread.

Getting ready- We had some “kido” food in case they didn’t want lasagna. Their menu included Peanut butter and Jelly sandwiches, Pumpkin shaped sugar cookies, chips, carrots and veggie dip and juice boxes.

Some easy decorations. We don’t have a ton of time to decorate as the room was being used for first service and lunch started after second service. So we used white paper rolls for table coverings and set out these pretty glass vases with floating flowers. We also had balloons for the main table.

Setting up the main table. Cutlery, salads, extra parm cheese and sauce, pastries and the kido table at the end.

The kido table

Garlic bread and lasagna in the warm buffet.

Kristen and Michelle serving punch. This was made with fruit punch, 7up, frozen strawberries, and rainbow sherbert. We also had bottled water, sodas, and juice boxes.

Alice and me after a full weekend of cooking!

These are such inexpensive decorations…I paid 99 cents a vase at Marcs and have reused them for SO many events. Fill them up with water and place a daisy inside and you have a very elegant/festive centerpiece.

Is this beautiful or what?! A room filled with fellowship.

Menu for the day:

Grandma Ruth’s Lasagna

Garlic Toast

Italian Tossed Salad

Eclairs/Cream Puffs

Pineapple Fluff

Simple Party Punch (I added frozen strawberries)

Kids Menu:

Peanut Butter and Jelly (25)

Carrots with Veggie dip (3 large bags)

Chips (25)

Pumpkin Shaped Sugar Cookies (25)

Juice Boxes (25)


Lasagna for 50 Adults
Prep time: 3 hours
Cook time: 1 hour 30 mins
Total time: 4 hours 30 mins
Serves: 50
Ingredients
  • 8 pounds Mozzerella (Pre-shredded)
  • 15 lbs Ricotta Cheese (whipped preferred)
  • 6 eggs
  • 2 Tbsp parsley
  • 1 Tbsp Garlic Powder
  • 5 lbs ground beef (butcher preferred)
  • 5 lbs Italian Sausage (butcher preferred)
  • 9 (9oz) boxes of Barilla flat /no boiling required Lasagna noodles
  • 3 cups Parmesan Cheese (for inside the lasagna)
  • Sauce:
  • 51 oz cans of Tomato Sauce
  • 2 51 oz cans of Tomato Puree
  • 1 51 oz can of Tomato Paste
  • 1 51 oz can of water (add this slowly and to your desired consistency-you may not need all of this)
  • 3 green peppers cut in half/cores and seeds removed
  • 6 stalks of celery cleaned off
  • 3 Tbsp Garlic Powder
  • 1/2 Sugar
  • 1 Cup Parmesan Cheese (into sauce)
  • 2 Tbsp Parsley
  • 2 Tbsp Oregano
  • 2 Tbsp Sweet Basil
Instructions
  1. Place all sauce ingredients in a large pot (I used 2 to prevent burning). Place halved green peppers and full celery in for flavoring only-these will come out of sauce before serving (do not dice-leave in tact). Let sauce simmer all day. Brown Italian Sausage and Ground Chuck. Beat 15 lbs Ricotta Cheese (whipped preferred),6 eggs,2 Tbsp parsley, 1 Tbsp Garlic Powder together in a large mixing bowl. Set aside. Place Mozzarella cheese in a large bowl.
  2. Assembly:
  3. Line up 3 20x12x4″ Chaffer pans (we are doing 3 layers)
  4. Ladle sauce in bottom of each pan to cover fully
  5. Layer noodles over sauce (I used 12 noodles a row)
  6. Spread Ricotta Cheese mixture over top
  7. Sprinkle with Mozzarella Cheese and Parmesan Cheese
  8. Sprinkle with ground chuck and Italian sausage
  9. Ladle sauce over to cover
  10. Begin again- 3 layers. Top with cheese and sprinkle with parsley
  11. Bake:
  12. Convection oven heated to 350 for 1 hour 15 mins. Uncover and bake 20 more mins. Keep checking because every oven is different.
Notes

*Keep in mind I made 1 lasagna with no meat.

Ladies, I hope I can be an encouragement to you to do this very thing at YOUR church! If you have the gift of hospitality, it will be such a blessing for you-not to mention those on the receiving end 🙂 Much love goes out to you…Thanks for reading.

Signature